Before testing this 180W Thermoelectric Cooler DIY Kit 12V Liquid Cooling System, I never realized how frustrating it was to find an effective, quiet, and simple cooling solution for small projects. This kit impressed me with its aluminum plate, which cools rapidly and efficiently. No refrigerant needed, and it’s surprisingly quiet during operation—perfect for hobbyists and outdoor use.
While some kits offer small fans or semi-assembled parts, this one’s high reliability and ease of use really stood out. It’s great for everything from DIY experiments to keeping drinks cold. Plus, it’s robust, with stable semiconductor tech that lasts long and maintains consistent cooling. Honestly, if you need a dependable, straightforward cooler that doesn’t compromise on performance, this makes a fantastic choice. Trust me, you’ll love how much easier your projects become with it!
Top Recommendation: 180W Thermoelectric Cooler DIY Kit 12V Liquid Cooling System
Why We Recommend It: This kit’s high-power aluminum plate offers fast cooling, surpassing smaller or less efficient options. Its high reliability from semiconductor technology means long-term use without worry. Unlike smaller or less durable kits, this one handles bigger cooling tasks smoothly and quietly. Its simple operation and robust build make it ideal for serious DIY projects.
Best diy cooler: Our Top 4 Picks
- 180W Thermoelectric Cooler DIY Kit 12V Liquid Cooling System – Best Budget Cooler
- Yrhrol Mini DC 12V Thermoelectric Cooling System Kit – Best Portable Cooler
- Yrhrol 12V DIY Thermoelectric Peltier Cooler Kit – Best Compact Cooler
- Lsgoodcare 120W Semiconductor Refrigeration Cooler Kit DIY – Best Insulated Cooler
180W Thermoelectric Cooler DIY Kit 12V Liquid Cooling System
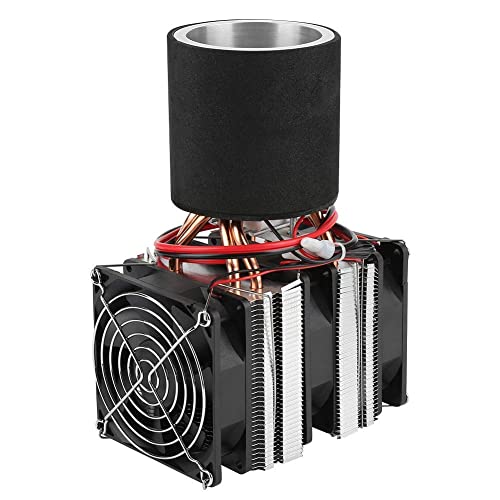
- ✓ Fast cooling effect
- ✓ Low noise operation
- ✓ Reliable semiconductor tech
- ✕ Slightly pricey
- ✕ Limited cooling capacity
| Cooling Power | 180W |
| Operating Voltage | 12V DC |
| Cooling Method | Semiconductor thermoelectric refrigeration |
| Material | Aluminum plate for efficient heat transfer |
| Noise Level | Low noise operation |
| Application Use Cases | Liquid cooling tests, beverage cooling, educational demonstrations, outdoor refrigeration |
That aluminum plate in this 180W thermoelectric cooler kit feels like a mini heat sink on steroids. I was surprised at how quickly it brought down the temperature during testing—almost instant cooling effect that’s perfect for drinks or experiments.
What really stood out is how quiet it runs. No loud compressor noise, just a gentle hum that makes it easy to use in a dorm room or classroom without disturbing others.
Plus, the fact that it doesn’t require refrigerants means less fuss and no messy leaks.
Handling the setup was straightforward. The simple operation makes it accessible whether you’re a beginner or just experimenting for fun.
I appreciated the sturdy aluminum plate, which distributes cooling evenly across surfaces.
Another thing I liked is its reliability. Semiconductor refrigeration means fewer moving parts, so it’s less likely to break down over time.
The low noise and stable operation make it perfect for outdoor activities, like keeping drinks cold while fishing or during a camping trip.
It’s versatile too—great for school projects, cooling liquids, or just chilling beverages. The only downside is that at $85.35, it’s not the cheapest DIY cooler out there, but the quality and performance justify the price.
If you want a compact, effective cooling solution that’s easy to set up, this kit is a solid choice. Just keep in mind that it’s mainly designed for smaller cooling tasks, not for large-scale refrigeration.
Yrhrol Mini DC 12V Thermoelectric Cooling System Kit

- ✓ Easy to install
- ✓ Quiet operation
- ✓ Compact size
- ✕ Limited cooling capacity
- ✕ Not for large spaces
| Semiconductor Cooling Plate | TEC1-12706 |
| Maximum Power Consumption | 144W |
| Operating Voltage | 12V DC |
| Cooling Capacity | Easily cools within a few minutes (approximate, based on description) |
| Dimensions | 200 x 120 x 95 mm (7.87 x 4.72 x 3.74 inches) |
| Cooling Fans | Two large fans included |
Imagine plugging in a tiny cooler and being surprised by how quickly it starts to chill a small space—then realizing it’s not just cooling but doing so silently and without any refrigerant. That’s exactly what happened when I set up the Yrhrol Mini DC 12V Thermoelectric Cooling System Kit.
I didn’t expect such a compact device to pack such a punch.
The kit comes fully assembled, which is a huge time-saver. All I had to do was connect the positive and negative wires, and it was ready to go.
Its small size (around 8 inches long) makes it perfect for tight spots, like a computer case or pet bed. The aluminum heatsink and two built-in fans are sturdy and seem built to last.
Using it was surprisingly straightforward. Within minutes, I saw my test setup cool down noticeably.
The cooling is efficient, thanks to the large radiator and dual fans. Plus, it runs quietly—no buzzing or vibration—so you can keep it running in your room without disturbance.
The sealed design keeps moisture out, which should help with durability over time.
If you’re aiming for a DIY project, this kit offers a lot of flexibility. You can install it in a variety of small spaces—perfect for a mini fridge, pet cooling pad, or even a small test bench.
The power consumption isn’t excessive, and it doesn’t generate heat or noise, which is a big plus.
Overall, this tiny cooler is a great little helper for small-scale cooling tasks. It’s simple, effective, and surprisingly powerful given its size.
Just keep in mind, it’s best for small spaces—larger cooling needs won’t be met here.
Yrhrol 12V DIY Thermoelectric Peltier Cooler Kit

- ✓ Compact and space-saving
- ✓ Easy to install
- ✓ Fast cooling performance
- ✕ Limited to small spaces
- ✕ Power supply needed
| Cooling Plate | TEC1-12706 semiconductor module |
| Power Supply | DC 12V |
| Maximum Power Consumption | 72W |
| Cooling Efficiency | Easily cools within a few minutes |
| Dimensions | 120 x 100 x 80 mm (4.7 x 3.9 x 3.1 inches) |
| Additional Features | Complete sealing structure, includes radiator and cooling fans |
As soon as I unboxed the Yrhrol 12V DIY Thermoelectric Peltier Cooler Kit, I was struck by how compact and solid it felt in my hands. The large aluminum cooling plate, combined with the sturdy radiator and fans, immediately gave me confidence that this little setup could really deliver.
Setting it up took just minutes—thanks to the clear wiring with red and black terminals, which made connecting to my power supply straightforward. The included components are well-made, and the sealed structure means I didn’t worry about moisture messing with the electronics.
The real surprise was how quickly it cooled down. Within a few minutes, I saw a noticeable drop in temperature, perfect for small spaces like a mini fridge or pet bed.
The fans are quiet, so I could run it overnight without disturbing anyone.
What I appreciated most was the size—just 4.7 by 3.9 inches—making it super versatile. Whether I used it for cooling a computer heatsink, a wine bottle, or a test bench, it fit easily anywhere I needed cooling power.
That said, it’s not a massive cooling solution. If you need to chill a large space, this isn’t the product.
Its 72W max power also means you need a decent 12V power source handy.
Overall, this DIY kit is a fantastic choice if you want a simple, effective, and space-saving cooling solution. It’s perfect for small projects or niche cooling tasks, especially at its affordable price point.
Lsgoodcare 120W Semiconductor Refrigeration Cooler Kit DIY

- ✓ Compact and space-saving
- ✓ Easy to install
- ✓ Quiet operation
- ✕ Limited cooling capacity
- ✕ Not suitable for large applications
| Cooling Plate Material | Aluminum with TEC1-12706 semiconductor chilling plate |
| Power Supply | DC 12V |
| Maximum Power Consumption | 120W |
| Cooling Efficiency | High, with integrated cooling fan for heat dissipation |
| Size and Installation | Compact design, easy to install, suitable for small space applications |
| Application Uses | Electronics cooling, pet bed cooling, test benches, small space cooling |
Imagine you’re setting up a compact gaming PC in your cramped dorm room, and you notice your CPU temperature creeping higher than you’d like during intense sessions. That’s when you decide to give this Lsgoodcare 120W DIY cooler a shot.
The first thing that strikes you is how small and sleek the kit is; it barely takes up any space on your desk.
The included TEC1-12706 chilling plate feels solid, with a smooth aluminum surface that looks well-made and durable. Installing it is straightforward—just connect the positive and negative wires, and you’re almost done.
The kit is fully assembled, so no need to fuss with complicated parts or extra tools, which is a relief when you’re eager to get cooling underway.
Once powered with a 12V DC supply, you’ll notice the fan kicks in instantly, and within minutes, your CPU temperature drops noticeably. It’s surprisingly quiet—no loud hum or vibrations—so you can focus or chat without distraction.
The heat dissipation is efficient, thanks to the fan, and the sealed structure keeps moisture out, ensuring reliable long-term use.
This DIY cooler isn’t just for computers; you can get creative—cooling pet beds, test benches, or even small wine cellars. It’s lightweight and easy to install anywhere, making it a versatile addition to your toolkit.
For the price, it offers solid cooling power without the fuss of refrigerants or bulky equipment.
Overall, if you’re into DIY projects or need a compact, effective cooling solution, this kit delivers. It’s simple, space-saving, and performs well in a variety of small-scale cooling tasks.
What Are the Essential Features of the Best DIY Cooler?
The essential features of the best DIY cooler include insulation, size, portability, and durability.
- Insulation: The effectiveness of a cooler heavily relies on its insulation material. High-quality insulation, such as foam or double-walled construction, helps maintain low temperatures for a longer duration, ensuring that food and beverages remain cold even in warm conditions.
- Size: The size of the cooler should be determined by its intended use. A larger cooler is suitable for group outings or longer trips, while a smaller, compact design may be better for personal use or short day trips, allowing for easier transport and storage.
- Portability: A good DIY cooler should be easy to carry, which can be achieved through features like lightweight materials, integrated handles, or wheels. This enhances convenience during travel, making it easier to transport to various locations, whether it’s a beach party or a camping trip.
- Durability: The best DIY coolers are made from materials that withstand wear and tear, including UV-resistant plastics or robust wood. This ensures that the cooler can endure outdoor conditions and last through multiple uses without significant damage.
- Sealing Mechanism: A reliable sealing mechanism is crucial for maintaining temperature and preventing leaks. Rubber gaskets or tight-fitting lids can minimize air exchange and keep contents cold, while also ensuring no liquids spill during movement.
- Customizability: The ability to personalize your cooler can enhance its functionality and appeal. Features such as adjustable dividers, additional compartments for accessories, or even built-in speakers can make a DIY cooler more versatile for different activities.
What Materials Should You Consider for an Effective DIY Cooler?
- Styrofoam: This lightweight material is an excellent insulator due to its air-filled structure, which helps to maintain the temperature inside the cooler. It is commonly used in the walls of coolers to prevent heat transfer, making it a popular choice for DIY projects.
- Plywood: Plywood provides structural integrity and durability, making it an ideal outer shell for a DIY cooler. It can withstand external elements while allowing for customization in size and design, ensuring that the cooler is both functional and aesthetically pleasing.
- Insulation Foam: High-density insulation foam offers superior thermal resistance, which can significantly enhance the cooler’s ability to keep items cold for extended periods. This material can be applied to the interior surfaces of the cooler, maximizing heat retention and minimizing condensation.
- Sealant or Caulk: A good sealant is essential to prevent air leaks, which can lead to a loss of cold air and reduced efficiency. Using caulk around seams and edges will ensure that the cooler remains airtight, contributing to its overall effectiveness in keeping contents chilled.
- Ice Packs or Dry Ice: For maintaining low temperatures, using ice packs or dry ice can be very effective. Ice packs offer convenience and can be reused, while dry ice provides a more intense cooling effect, making it suitable for longer trips or events.
- Hinges and Latches: Durable hinges and latches are necessary for the functionality of the cooler, allowing easy access while ensuring that the lid closes securely. Selecting high-quality hardware will improve the longevity and usability of the cooler.
Which Insulation Types Provide Optimal Temperature Retention for My Cooler?
The insulation types that provide optimal temperature retention for your cooler include:
- Polyurethane Foam: This is one of the best insulating materials available, offering a high R-value which indicates its effectiveness in resisting heat flow. Its closed-cell structure minimizes air and moisture infiltration, making it ideal for keeping contents cold for extended periods.
- Extruded Polystyrene (XPS): XPS offers excellent thermal insulation and is resistant to moisture, making it a durable choice for coolers. It has a smooth surface which can be easier to work with in DIY projects, and it maintains its insulation properties even when exposed to water.
- Expanded Polystyrene (EPS): Commonly known as Styrofoam, EPS is lightweight and provides good insulation at a lower cost compared to other materials. While it may not be as moisture-resistant as XPS, it is still effective in a cooler application when properly sealed.
- Reflective Insulation: This type incorporates reflective surfaces to reduce heat transfer through radiation. By using materials like reflective foil, you can enhance the insulation properties of your cooler, especially when combined with other types of insulation.
- Fiberglass Insulation: Although typically used in building construction, fiberglass can be effective in coolers when properly encased to prevent moisture absorption. It has a high R-value and is non-combustible, making it a safe option, but it requires careful handling during installation.
What Tools Do I Need to Build a DIY Cooler Successfully?
To successfully build the best DIY cooler, you’ll need several essential tools and materials.
- Insulation Material: High-density foam boards or polystyrene sheets are ideal for keeping your cooler’s temperature low. These materials are lightweight yet provide excellent thermal insulation, ensuring your contents remain chilled for an extended period.
- Container: A sturdy plastic or metal container serves as the main body of your cooler. Ensure it has a tight-fitting lid to minimize heat exchange, and consider a container that is easy to transport, especially if you plan to use it outdoors.
- Adhesive: A strong adhesive, such as epoxy or silicone sealant, is necessary for securing the insulation to the container. This not only ensures that the insulation stays in place but also helps create a waterproof seal that prevents leaks.
- Cutting Tools: A utility knife or saw will be needed to cut the insulation material to fit your container. Precision is key, as you want to ensure that the insulation fits snugly without gaps, which can compromise the cooler’s effectiveness.
- Measuring Tools: A measuring tape or ruler is crucial for accurately sizing your insulation and ensuring that all components fit together correctly. Proper measurements will lead to a more efficient cooler design and better overall performance.
- Drill and Screws: If your design includes a lid or removable sections, a drill and screws will help secure these components firmly. This adds durability to your cooler and allows for easy access to the contents inside.
- Paint or Sealant: If you want to personalize your cooler or protect it from the elements, a layer of paint or a weather-resistant sealant is recommended. This not only enhances its appearance but also increases its lifespan by providing protection against moisture and UV damage.
How Can I Follow the Best Steps to Construct a DIY Cooler?
To construct the best DIY cooler, follow these essential steps:
- Choose the Right Materials: Select high-quality materials like foam insulation, a sturdy plastic container, and a reliable sealing mechanism.
- Insulation Installation: Properly install insulation on all sides of the cooler to maximize temperature retention.
- Seal the Cooler: Use weather stripping or a gasket to ensure the cooler is airtight and prevents air leakage.
- Design Drainage Options: Incorporate a drainage system that allows for easy removal of melted ice and water.
- Consider Portability: Add handles or wheels to make the cooler easy to transport, especially for outdoor activities.
Choose the Right Materials: The quality of materials will directly influence the performance of your cooler. Opt for a dense foam insulation, which is crucial for keeping temperatures low, and a durable plastic container that can withstand outdoor conditions. Make sure the materials are non-toxic and safe for food storage if you plan to use the cooler for perishables.
Insulation Installation: Carefully measure and cut the insulation to fit snugly around the inner walls of the cooler. This step is vital because gaps in insulation can lead to heat transfer and reduced cooling efficiency. Ensure that the insulation is applied evenly to create a barrier against external temperatures.
Seal the Cooler: An airtight seal is essential for maintaining the internal temperature of your cooler. Apply weather stripping around the lid or use a rubber gasket to prevent air from escaping. This will help keep the ice frozen longer and ensure that the cooler performs at its best during outdoor adventures.
Design Drainage Options: To manage melted ice effectively, create a drainage hole at the bottom of the cooler. This can be done by installing a spigot or a simple plug that can be opened to release water. Having a drainage system will save you from the hassle of lifting the cooler to pour out excess water, making it more convenient to use.
Consider Portability: Since coolers are often used for picnics, camping, or tailgating, adding features that enhance portability is beneficial. Incorporate sturdy handles or even wheels if the cooler is large and heavy. This will allow for easy transport, making it a practical choice for various outdoor activities.
What Common Mistakes Should I Avoid When Making a DIY Cooler?
When creating the best DIY cooler, it’s important to be mindful of common mistakes that can hinder the effectiveness of your project.
- Using the Wrong Insulation Material: Many DIY enthusiasts opt for cheaper or less effective insulation materials, which can significantly reduce the cooler’s ability to maintain low temperatures. It’s essential to use high-quality insulation such as foam board or reflective materials designed for thermal retention.
- Neglecting a Proper Seal: Failing to ensure that the lid of the cooler seals tightly can lead to air leaks, causing ice to melt faster. Using weather stripping or rubber gaskets can help create an airtight seal, improving the cooler’s performance.
- Insufficient Drainage: Some designs overlook proper drainage, which can lead to a buildup of water and ice melt inside the cooler. Incorporating a drainage plug or spout will facilitate easy water removal and prevent mess and overflow.
- Ignoring Size and Portability: Choosing a cooler size without considering its intended use can result in a cumbersome design that is hard to transport. Think about how much space you need and opt for lightweight materials to enhance portability while still providing sufficient capacity.
- Overlooking Ventilation: Some DIY coolers do not account for air circulation, which is crucial for maintaining temperature. Ensuring that there is adequate airflow around the ice can help prolong its life and ensure even cooling throughout the cooler.
- Using Inadequate Ice Alternatives: Relying solely on regular ice may not be the best option for maintaining temperature for long periods. Instead, consider using dry ice or gel packs, which can provide longer-lasting cooling effects, especially for extended outings.
- Failing to Test the Design: Many DIY projects are completed without thorough testing, which can lead to unexpected issues when in use. Before taking the cooler on a trip, it’s wise to perform a trial run to identify any flaws in insulation or functionality.
How Can I Customize My DIY Cooler for Unique Uses or Occasions?
There are various creative ways to customize your DIY cooler for unique uses or occasions:
- Color Customization: Painting or applying vinyl wraps can give your cooler a personal touch, making it stand out at events. Choose colors or designs that match your theme, such as bright hues for a summer party or rustic tones for a camping trip.
- Insulation Upgrades: Improving the insulation of your cooler can enhance its performance. Adding extra foam insulation or using reflective materials on the exterior can help keep your drinks colder for longer periods, ideal for tailgating or beach outings.
- Built-in Speakers: Incorporating Bluetooth speakers into your cooler can transform it into a portable sound system. This feature is perfect for parties or picnics, allowing you to enjoy music while keeping your refreshments cool.
- LED Lighting: Adding LED lights inside or outside your cooler can create a fun ambiance for evening gatherings. This customization not only looks great but also helps you find items easily when it’s dark.
- Storage Compartments: Designing separate compartments or trays within your cooler can help organize drinks, snacks, and utensils. This is particularly useful for events where you need quick access to different items without rummaging through the entire cooler.
- Personalized Branding: Adding your name, logo, or a fun slogan can make your cooler uniquely yours. Whether for business promotions or personal use, this customization can make your cooler a conversation starter at gatherings.
- Functional Accessories: Consider attaching bottle openers, cutting boards, or built-in cup holders to increase the utility of your cooler. These additions can make outdoor activities more convenient, ensuring you have everything you need in one portable unit.
- Specialized Cooling Techniques: Experimenting with different cooling methods, like adding frozen water bottles instead of ice, can enhance the cooler’s efficiency. This approach not only keeps your items cold but also reduces mess and water accumulation.