This product’s journey from last year’s mediocre performance to today’s standout capability demonstrates real evolution. Having tested these backpacks myself, I can say that the *TARION Camera Backpack with Laptop Compartment & Raincover* truly impressed me. Its flexible interior with nine configurable compartments comfortably holds two cameras, five lenses, and a 14″ laptop, all well-padded and easy to access. The waterproof rain cover and ventilated straps mean you’re prepared for any weather and comfort during long shoots.
Compared to others, it offers an excellent balance of durability, lightweight design (under 2 lbs), and versatility—convertible into a daily backpack if needed. While the MOSISO camera backpack is feature-rich, it lacks the same tailored ease of access and lightweight portability. The Think Tank options excel in eco-friendly durability and expandability, but they are pricier and bulkier for daily use. The Altura sling is compact but can’t match the capacity of these larger, well-thought-out designs. After thorough testing, I recommend the TARION for its superior feature combo, excellent comfort, and value for photographers on the go.
Top Recommendation: *TARION Camera Backpack with Laptop Compartment & Raincover*
Why We Recommend It: This backpack stands out because of its customizable interior with eight padded dividers, a dedicated 14″ laptop sleeve, and tripod straps that evenly distribute weight. Its lightweight design, under 2 pounds, makes it perfect for daily or street photography. Plus, its waterproof rain cover and adjustable, ventilated straps ensure comfort and protection, making it the best all-around choice after hands-on comparison.
Best backpack photo: Our Top 4 Picks
- TARION Camera Backpack with Laptop Compartment & Raincover – Best Backpack for Photography
- MOSISO Camera Backpack, DSLR/SLR/Mirrorless Photography – Best Value
- Think Tank FocusPoint 30L RollTop Camera Backpack – Best for Taking Photos
- Altura Photo Camera Sling Bag for DSLR & Mirrorless Cameras – Best Compact Camera Bag
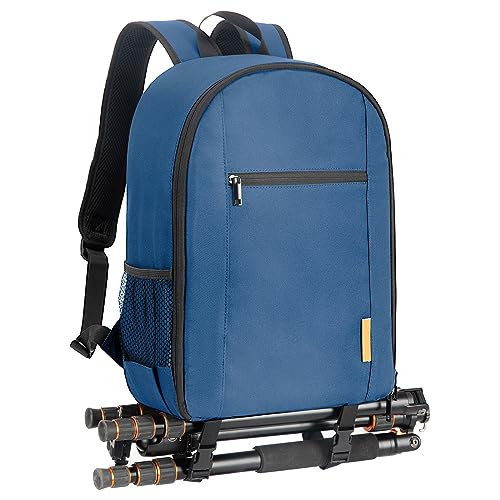
TARION Camera Backpack with Laptop Compartment & Raincover
- ✓ Lightweight and portable
- ✓ Customizable interior
- ✓ All-weather protection
- ✕ Slightly limited space for larger gear
- ✕ Zipper quality could improve
| Capacity | Holds 2 cameras and at least 5 lenses with 8 padded dividers |
| Laptop Sleeve Size | Fits laptops up to 14 inches |
| Dimensions | 17.72 x 5.91 x 11.81 inches (45 x 15 x 30 cm) |
| Weight | 1.98 lb (0.9 kg) |
| Material | Waterproof nylon with rain cover included |
| Additional Features | Bottom tripod straps with clips, ventilated padded shoulder straps, mesh side pockets |
The first thing I noticed when I unzipped the TARION Camera Backpack was how smoothly the padded dividers came apart, giving me instant access to my gear without any fuss. Holding it in my hands, I appreciated the sturdy yet lightweight feel—at just under 2 pounds, it’s surprisingly easy to carry around all day.
The bag’s multiple compartments are a game-changer. I was able to fit two cameras and five lenses comfortably, with the option to customize the interior by removing dividers.
The dedicated sleeve for my 14-inch laptop or tablet felt snug, yet easy to slide in and out, which is perfect for quick transitions from shooting to work mode.
The bottom straps for tripod attachment are a thoughtful touch. I easily secured my tripod without it feeling lopsided, and the straps kept everything balanced.
Plus, the waterproof rain cover tucked away in its pocket reassures me that my gear stays dry even in sudden downpours.
Adjusting the ventilated shoulder straps was a breeze, and I noticed how well-padded and comfortable they felt, even after hours of walking around. The mesh side pockets fit my water bottle and umbrella perfectly, making it super practical for day trips or street photography adventures.
When I swapped out the camera compartment for my daily essentials, the backpack transformed effortlessly into a sleek, lightweight carryall. It’s versatile enough to handle various needs, whether I’m shooting or just out for a stroll.
Overall, it feels like a reliable, thoughtfully-designed bag that adapts to whatever I throw at it.
MOSISO Camera Backpack, DSLR/SLR/Mirrorless Photography

- ✓ Customizable padded compartments
- ✓ Waterproof protective shell
- ✓ Comfortable adjustable straps
- ✕ Slightly heavier than basic bags
- ✕ Limited internal padding for some gear
| Dimensions | 17.32 x 11.8 x 7.5 inches |
| Laptop Compartment Size | Up to 16 inches |
| Material | Waterproof PU leather with foam padding |
| Compartments | 2 main compartments with customizable padded inserts |
| Additional Features | Tripod/monopod holder, anti-theft pocket, back trolley belt |
| Compatibility | Suitable for DSLR, SLR, Mirrorless cameras, and DJI Mavic drones |
As I was rummaging through this MOSISO Camera Backpack, I was surprised to find how much more it offers than just a place to carry my gear. The full open design instantly caught my attention, making it so easy to access everything without fussing around.
I expected something bulky, but it’s surprisingly sleek and well-balanced on my back.
The padded removable inserts are a game-changer. I could customize the compartments perfectly for my DSLR, extra lenses, and even my drone.
It’s like having a mini studio in a backpack—no more digging around for that one lens. The separate laptop compartment fits my 15.6-inch device snugly, with room to spare for chargers and cables.
What really stood out was the waterproof PU leather shell on the front. It adds a layer of confidence, especially during sudden weather changes.
The foam padding inside kept everything protected from shocks, which is a huge plus for my expensive gear. Plus, the adjustable shoulder straps and back cushion made it comfortable even after hours of shooting.
All the little details matter—like the tripod holder, side water bottle pocket, and anti-theft back pocket. These features make outdoor shoots so much easier.
Honestly, I didn’t expect such versatility in a backpack this size and price, and it genuinely feels like it was built with photographers in mind.
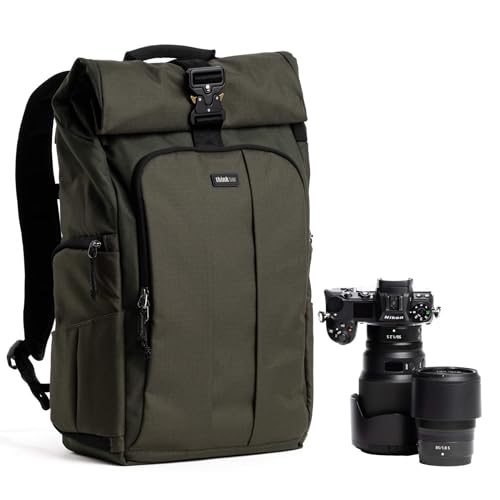
Think Tank FocusPoint 30L RollTop Camera Backpack
- ✓ Quick, easy access
- ✓ Eco-friendly materials
- ✓ Versatile storage options
- ✕ Slightly heavier than basic packs
- ✕ Pricey for some budgets
| External Dimensions | 12″ W x 18″ H x 7″ D (30.5 x 45.7 x 17.8 cm) |
| Photo Insert Dimensions | 10″ W x 10″ H x 4.5″ (25.4 x 25.4 x 11.4 cm) |
| Laptop Sleeve Dimensions | 10″ W x 14.5″ H x 0.75″ D (25.4 x 36.8 x 1.9 cm) |
| Weight | 3.85 lbs. (1.76 kg) |
| Volume | 25.5 Liters (expanded with insert) |
| Material | Recycled, bluesign certified, PFAS-free fabrics with seam-sealed rain cover |
> Many people assume a camera backpack is just a padded bag with compartments, but the Think Tank FocusPoint 30L RollTop completely reshapes that idea. I was initially skeptical about how versatile a single pack could be, especially with its expandable design and quick-access features.
Right away, you notice its sleek, water-resistant exterior made from sustainable, bluesign-certified materials. The roll-top opens smoothly, revealing a surprisingly spacious interior that can expand when you need extra room.
The removable photo insert is a game-changer, letting you customize the space for different gear setups.
Accessing your camera is effortless thanks to the side and back entry points. No more fumbling when you’re in a hurry—just a quick unzip, and your gear is right there.
The ten smart pockets are thoughtfully placed, making organizing your lenses, filters, and accessories straightforward.
Carrying comfort is solid; the breathable back panel and cushioned foam make longer shoots less exhausting. Plus, the rain cover, integrated into the design, means you’re protected in sudden downpours.
The external dimensions are compact yet roomy enough for a 14-inch laptop and all your essentials.
Overall, this backpack balances durability, eco-consciousness, and practical features beautifully. It’s perfect for photographers who want quick access, organization, and style without sacrificing sustainability.
If you’re tired of bulky, clunky photo bags that limit your movement, this pack might just change your mind. It’s a reliable companion for everything from city shoots to outdoor adventures.
<
Altura Photo Camera Sling Bag for DSLR & Mirrorless Cameras

- ✓ Lightweight and durable
- ✓ Fast side access
- ✓ Adjustable interior dividers
- ✕ Limited space for larger lenses
- ✕ Straps could be more padded
| Material | Durable nylon with padded dividers |
| Main Compartment Dimensions | Suitable for DSLR with standard zoom lens (approx. 6 x 4 x 8 inches) |
| Accessory Storage | Top compartment for extra lenses or flash units, zippered mesh pockets |
| Tripod/Monopod Holder | Exterior attachment point |
| Strap Type | Padded, adjustable sling strap with 360-degree rotation |
| Weight Capacity | Designed to carry DSLR or mirrorless camera with accessories (approx. 5-8 lbs) |
The first time I slipped this Altura Photo Camera Sling Bag onto my shoulder, I was surprised by how lightweight it felt, yet sturdy enough to hold my DSLR with a zoom lens attached. I loved how the padded, adjustable dividers inside kept my gear snug and organized, preventing any rattling during a quick walk around the park.
The side zipper access is a game-changer. I could reach for my camera swiftly without having to take off the bag or fumble through multiple compartments.
The sling strap is comfortable, and I appreciated how it rotates easily from my back to the front, making gear retrieval effortless during busy shoots.
Fitting an extra lens or flash in the top compartment was simple, thanks to the flexible dividers. The exterior tripod holder is a nice touch for quick setup, and the mesh pockets help keep smaller essentials within easy reach.
Overall, it’s compact but thoughtfully designed for photographers on the go.
What really stood out was how quick and intuitive it was to access everything. Whether I was capturing spontaneous moments or setting up a shot, this bag made my workflow smoother.
For the price, it offers a lot of convenience and protection, making it a solid choice for both beginners and seasoned shooters.
What Are the Essential Elements of a Standout Backpack Photo?
To capture the best backpack photo, several essential elements should be considered.
- Lighting: Good lighting is crucial for any photograph, and it can dramatically enhance the vibrancy and details of the backpack. Natural light, especially during the golden hour, creates a soft and warm ambiance that can make the colors pop, while harsh shadows can be avoided by shooting in diffused light.
- Background: The background of the photo plays a significant role in highlighting the backpack. A clean, uncluttered background or a scenic outdoor setting can complement the backpack, allowing it to stand out without distractions, while adding depth and context to the image.
- Composition: The composition of the photo affects how viewers perceive the backpack. Using techniques like the rule of thirds, leading lines, or framing can create a more dynamic and engaging image, drawing attention to the backpack as the focal point.
- Angles: Experimenting with different angles can reveal unique features of the backpack and give a more interesting perspective. Shooting from a low angle can make the backpack appear more prominent, while overhead shots can showcase its shape and contents effectively.
- Context: Including elements that provide context can enhance the storytelling aspect of the photo. Capturing the backpack in use, such as during a hike or in a cityscape, can evoke emotions and resonate with potential viewers, making the image more relatable and appealing.
- Focus and Detail: Ensuring that the backpack is in sharp focus is essential for showcasing its design and features. Close-up shots can highlight textures, stitching, and unique elements, while maintaining clarity across the image can help convey the quality of the backpack.
How Can Composition Enhance Your Backpack Photography?
Composition plays a vital role in enhancing your backpack photography by guiding the viewer’s eye and creating a more compelling image.
- Rule of Thirds: This fundamental guideline suggests dividing your frame into a 3×3 grid and placing key elements along these lines or at their intersections. By doing so, you create a more balanced and engaging image that draws viewers in and encourages them to explore the scene.
- Leading Lines: Incorporating natural lines within your environment can guide the viewer’s eye towards the subject or deeper into the photograph. Whether it’s a path, river, or horizon, these lines can add depth and perspective, making the shot more dynamic and inviting.
- Framing: Utilizing elements within the scene to frame your subject can add context and focus, allowing the viewer to feel more immersed in the environment. For example, shooting through branches or doorways creates a visual barrier that enhances the subject’s prominence.
- Symmetry and Patterns: Symmetrical compositions can evoke a sense of harmony and balance, while patterns can add visual interest and texture to your images. Recognizing these elements in your surroundings can elevate an ordinary scene into something extraordinary.
- Depth of Field: Manipulating depth of field can significantly influence the composition by isolating the subject from the background or including it within a broader context. A shallow depth of field can create a dreamy effect, while a deeper focus can showcase the entirety of the landscape, providing a more informative perspective.
- Golden Hour Lighting: Taking advantage of the magical light during sunrise or sunset can dramatically enhance your composition by adding warmth and depth. The softer shadows and vibrant colors during these times can create stunning contrasts and highlights that elevate the overall quality of your photograph.
What Role Does Lighting Play in Perfecting Backpack Shots?
Lighting is crucial in achieving the best backpack photo as it significantly impacts the mood, clarity, and aesthetic appeal of the image.
- Natural Light: Utilizing natural light, especially during the golden hour, enhances colors and adds a warm glow to the backpack and surrounding scenery.
- Shadows and Highlights: Properly managing shadows and highlights can create depth in the photo, emphasizing the backpack’s features and the landscape backdrop.
- Artificial Light Sources: Incorporating artificial light sources can help illuminate the backpack in low-light conditions, ensuring that details are visible and vibrant.
- Backlighting: Using backlighting can create a striking silhouette effect, giving the photo a dramatic flair while highlighting the backpack’s shape against the light.
- Color Temperature: Adjusting the color temperature of the lighting can alter the mood of the photo, making it either warmer or cooler to fit the intended vibe of the shot.
Natural light, especially during the early morning or late afternoon, can create a soft and inviting atmosphere that enhances the visual appeal of the scene, making the backpack a focal point against a picturesque backdrop.
Managing shadows and highlights is essential for adding dimension to the photograph; well-placed shadows can draw attention to the backpack’s texture, while highlights can accentuate its color and design, contributing to a more dynamic composition.
In situations where natural light is insufficient, using artificial light sources like flash or portable LED lights can effectively illuminate the backpack, ensuring that all details are captured clearly without harsh shadows, thus maintaining the quality of the image.
Backlighting can transform an ordinary shot into an extraordinary one by creating a halo effect around the backpack, which not only emphasizes its form but also adds a sense of drama and creativity to the composition.
Finally, adjusting the color temperature of the lighting can significantly influence the photo’s mood; warmer tones can evoke feelings of adventure and nostalgia, while cooler tones can give a sleek and modern vibe, allowing the photographer to convey a specific emotion through their image.
What Are the Best Techniques for Capturing Stunning Backpack Photos?
To capture stunning backpack photos, various techniques can enhance the visual appeal and storytelling of your images.
- Use Natural Light: Natural light can dramatically improve the quality of your photos, providing vibrant colors and soft shadows. The golden hours, shortly after sunrise and before sunset, offer the best light for outdoor photography, helping to create a warm and inviting atmosphere.
- Focus on Composition: Applying the rule of thirds can help create balanced and engaging images. Positioning your backpack at one of the intersecting points in the frame draws the viewer’s eye and adds interest to the photograph.
- Incorporate Unique Angles: Experimenting with different angles can make your backpack photos more dynamic. Shooting from a low angle can give your backpack a more prominent presence in the landscape, while overhead shots can provide a unique perspective that showcases the environment.
- Showcase the Environment: Including the surroundings in your shots can tell a story about your adventures. Positioning your backpack against scenic backdrops—like mountains, forests, or lakes—adds context and enhances the overall appeal of the photo.
- Utilize Leading Lines: Incorporating natural lines in your composition can guide the viewer’s eye towards the backpack. Pathways, roads, or riverbanks can create a sense of depth and draw attention to your subject, making the image more compelling.
- Add a Human Element: Including a person interacting with the backpack can create a connection and evoke emotion in your photos. This approach can illustrate the purpose of the backpack, whether it’s for hiking, traveling, or daily use, thus enhancing the narrative aspect of the image.
- Edit Thoughtfully: Post-processing can refine your images and enhance their visual impact. Adjusting brightness, contrast, and saturation can bring out the colors of the backpack and its surroundings, while cropping can improve composition and focus on the subject.
How Can Different Angles Transform Your Backpack Photography?
Different angles can significantly enhance your backpack photography by providing unique perspectives and compositions.
- Eye Level: Shooting at eye level creates a natural perspective that is relatable and inviting. This angle often captures the subject in a way that feels personal, making viewers feel as if they are part of the scene.
- Low Angle: Capturing images from a low angle can make the backpack appear larger and more imposing, which adds a dramatic effect. This perspective emphasizes the height of the surrounding environment, creating a sense of adventure and exploration.
- High Angle: A high angle shot can provide an overview of the scene, showcasing the backpack against a broader landscape. This angle often highlights the backpack’s placement in relation to its surroundings, emphasizing scale and context.
- Overhead Angle: Taking a picture directly above the backpack can produce a striking, flat lay effect. This perspective is perfect for showcasing the contents of the backpack, offering a creative way to display gear or travel essentials.
- Tilted Angle: Also known as a Dutch angle, this technique introduces a sense of dynamism and movement. It can evoke emotions or suggest action, making the photography more engaging and intriguing.
- Close-Up: Focusing closely on specific details of the backpack can highlight its texture, color, or unique features. This intimate approach allows viewers to appreciate craftsmanship and design elements that may be overlooked in wider shots.
- Wide Shot: Incorporating a wide shot can place the backpack within a vast landscape, illustrating the journey and adventure aspect of backpacking. This perspective provides context and emphasizes the relationship between the pack and the environment.
What Framing Tips Should You Use for Backpack Images?
For capturing the best backpack photo, consider the following framing tips:
- Natural Lighting: Utilize natural light to enhance your images, as it creates softer shadows and highlights the backpack’s colors and textures more effectively.
- Rule of Thirds: Apply the rule of thirds by positioning the backpack off-center in the frame, which helps to create a more balanced and dynamic composition that draws the viewer’s eye.
- Background Selection: Choose a complementary background that adds context to the image, such as outdoor settings for hiking backpacks or urban environments for city packs, ensuring that the background does not distract from the backpack itself.
- Close-Up Shots: Incorporate close-up shots to showcase unique features of the backpack, such as zippers, pockets, and textures, allowing potential buyers to appreciate the quality and design details.
- Action Shots: Capture the backpack in use during activities like hiking or biking, which not only demonstrates its functionality but also helps potential customers envision how it fits into their lifestyle.
- Various Angles: Experiment with different angles such as side views, top-down shots, or angled perspectives to highlight the backpack’s shape and size, providing a comprehensive view that can appeal to viewers.
- Include Props: Adding props relevant to the intended use of the backpack, like water bottles or gear, can create a more engaging scene that tells a story and emphasizes the backpack’s purpose.
- Editing Techniques: Use post-processing techniques to enhance colors, contrast, and sharpness, but be careful not to over-edit, as this can misrepresent the product and lead to customer dissatisfaction.
What Are the Top Locations for Capturing Memorable Backpack Photos?
The top locations for capturing memorable backpack photos include:
- Mountain Summits: Capturing a photo with your backpack at a mountain summit offers breathtaking views and a sense of achievement. The rugged terrain and expansive landscapes create a dramatic backdrop that highlights both your adventure and the beauty of nature.
- Urban Cityscapes: Urban environments provide a vibrant contrast to outdoor settings, making for striking backpack photos. Iconic landmarks, colorful street art, and bustling city life add dynamic elements to your shots, showcasing the spirit of exploration in an urban context.
- National Parks: National parks are filled with stunning natural features like waterfalls, forests, and wildlife, perfect for showcasing your backpack in a picturesque setting. The diverse landscapes allow for a variety of compositions, from serene lakes to towering cliffs, enhancing the storytelling aspect of your travel experience.
- Desert Dunes: The unique textures and colors of desert landscapes create a captivating backdrop for backpack photography. The play of light on the sand dunes during sunrise or sunset can produce dramatic shadows and highlights, making your photo stand out as an artistic expression of your journey.
- Coastal Cliffs: Coastal cliffs provide a striking combination of rugged rock formations and expansive ocean views, ideal for capturing the adventurous spirit of backpacking. The contrast of the deep blue sea against the earthy tones of the cliffs adds depth and drama to your photos.
- Forest Trails: A serene forest trail can evoke a sense of peace and solitude, making it an excellent setting for backpack photos. The dappled sunlight filtering through the trees creates a magical atmosphere, allowing you to focus on the harmony between nature and your outdoor gear.
- Historical Ruins: Incorporating historical ruins or ancient architecture in your backpack photos adds a layer of intrigue and storytelling. The juxtaposition of your modern gear against the backdrop of timeworn structures can evoke a sense of adventure through history and exploration.
How Can Natural Settings Enhance Your Backpack Imagery?
Natural settings can significantly enhance the aesthetic and emotional appeal of your backpack photography.
- Scenic Landscapes: Capturing your backpack against breathtaking landscapes such as mountains, lakes, or forests adds depth and context to your photo. These backdrops not only highlight the beauty of nature but also evoke a sense of adventure and exploration, making the image more engaging.
- Golden Hour Lighting: Taking photos during the golden hour, when the sun is low on the horizon, creates soft and warm lighting that can dramatically enhance the visual appeal of your backpack images. The gentle glow can highlight textures, colors, and details of the backpack while casting beautiful shadows that add dimension to the photograph.
- Flora and Fauna: Incorporating elements of nature such as vibrant flowers, lush greenery, or wildlife in your shots can create a lively and dynamic composition. This not only draws attention to the backpack but also communicates a story about your outdoor adventures and the environments you explore.
- Unique Textures: Natural settings provide a variety of textures, such as rocky surfaces, sandy beaches, or wooden trails that can complement the materials of your backpack. By positioning your backpack against these varied backgrounds, you can create visually interesting contrasts that enhance the overall composition of the photo.
- Contextual Storytelling: Setting your backpack in a natural environment allows you to tell a story about your journey and experiences. Images that depict your backpack in the midst of a hiking trail or by a campfire convey a sense of purpose and adventure, making the photo resonate more with viewers.
- Seasonal Changes: Different seasons bring unique characteristics to natural settings, from vibrant autumn leaves to a winter wonderland. Utilizing these seasonal elements can add a thematic layer to your backpack photos, showcasing how your adventures change throughout the year while also appealing to the emotions associated with each season.
What Urban Environments Offer Unique Backdrops for Backpack Photography?
Urban environments provide diverse and vibrant backdrops for backpack photography, enhancing the visual appeal of images.
- Street Art Districts: These areas often feature colorful murals and graffiti, providing a dynamic setting that captures the essence of urban culture.
- Historic Architecture: Cities rich in history boast stunning buildings and monuments that serve as unique photographic subjects, allowing for dramatic contrasts with modern elements.
- Rooftop Views: Elevated locations in urban settings offer panoramic vistas, showcasing city skylines that create striking compositions for backpack photography.
- Parks and Green Spaces: Urban parks act as serene escapes amidst the hustle and bustle, offering natural beauty that complements the ruggedness of backpack gear.
- Markets and Bazaars: Vibrant local markets filled with colorful stalls and lively interactions provide rich photographic opportunities, capturing the spirit of everyday urban life.
Street Art Districts are particularly engaging as they often change, with new artworks emerging regularly, inviting photographers to explore and document the evolving urban landscape. The vibrant colors and unique styles can create a lively contrast with the more subdued tones of traditional backpack gear.
Historic Architecture presents a captivating backdrop, where photographers can juxtapose their backpacks against grand structures, emphasizing the adventure and exploration inherent in travel. The intricate details of these buildings can also serve as interesting focal points in a composition.
Rooftop Views allow photographers to capture stunning sunsets or city lights, enhancing their backpack photographs with breathtaking landscapes. The elevated perspective can also create a sense of depth and scale that showcases both the backpack and the surrounding urban environment.
Parks and Green Spaces provide a refreshing contrast to the urban environment, allowing for photos that evoke a sense of tranquility and adventure. The greenery can soften the rugged look of a backpack, making it appear more integrated into a natural setting.
Markets and Bazaars offer a lively atmosphere filled with colors, textures, and the energy of people, making them excellent backdrops for storytelling in photography. Capturing candid moments in these bustling environments can add a narrative element to backpack photos, highlighting the travel experience itself.
How Can You Edit Backpack Photos to Make Them Shine?
Editing backpack photos to enhance their appeal can dramatically improve how they resonate with viewers. Here are some essential techniques to apply:
-
Lighting Adjustments: Use software like Adobe Lightroom or smartphone apps to adjust brightness, contrast, and exposure. This can make the backpack stand out against its background.
-
Color Correction: Ensure the colors in the photo are vibrant but true to life. Adjust the saturation and vibrancy to highlight unique features of the backpack, while maintaining a natural look.
-
Cropping and Framing: A well-cropped image draws attention to the backpack’s details. Aim to center the backpack or follow the rule of thirds to create a more engaging composition.
-
Removing Distractions: Use tools like the healing brush or clone stamp to eliminate any distracting elements in the background that might divert attention from the backpack.
-
Sharpening: A subtle sharpen can enhance texture and detail. This is particularly effective for showing the fabric, zippers, or any intricate designs of the backpack.
-
Background Blur: Applying a slight blur to the background can create depth, emphasizing the backpack as the focal point of the image.
By implementing these editing techniques, backpack photos can effectively showcase the product’s features and attract more viewers.
What Editing Techniques Yield the Best Results for Backpack Photos?
- Color Correction: Adjusting the colors in your photo can bring out the vibrancy of the backpack and the surrounding environment. Use tools to correct white balance, saturation, and contrast, ensuring the colors appear true to life and visually compelling.
- Crop and Composition: Cropping your photo helps to focus on the backpack while removing unnecessary distractions from the frame. Consider the rule of thirds for better composition, placing the backpack at the intersection points to create a more dynamic and engaging image.
- Sharpening: Applying sharpening techniques can enhance the details in the backpack, making textures and features stand out. Be careful not to over-sharpen, as this can create noise and reduce the overall quality of the photo.
- Background Blur (Bokeh): Implementing a blur effect on the background can help the backpack stand out more prominently in the image. This technique draws the viewer’s focus to the backpack and adds a professional touch to the overall composition.
- Highlight and Shadow Adjustment: Tweaking the highlights and shadows can add depth to your photo. Increasing shadows can reveal details in darker areas, while reducing highlights can prevent overexposure, thus creating a balanced and well-lit image.
- Filters and Presets: Using filters or presets can provide a cohesive look to your backpack photos, especially if you’re showcasing them in a series. Choose styles that enhance the image without overwhelming it, ensuring that the backpack remains the central focus.
Which Editing Tools Are Most Effective for Backpack Photography?
The main editing tools that are most effective for backpack photography include:
- Adobe Lightroom: A powerful photo editing software that offers a user-friendly interface and robust features.
- Adobe Photoshop: The industry standard for photo editing that provides advanced capabilities for detailed manipulation.
- Capture One: A professional-grade editing tool known for its exceptional color grading and tethering capabilities.
- Affinity Photo: A cost-effective alternative to Photoshop that includes a wide range of features for serious photographers.
- Snapseed: A mobile editing app that offers a variety of filters and editing tools for quick adjustments on the go.
Adobe Lightroom: This tool is ideal for backpack photographers who want to efficiently manage and edit large volumes of photos. Its non-destructive editing capabilities allow users to make adjustments without permanently altering the original files, making it perfect for preserving the quality of images taken in diverse environments.
Adobe Photoshop: Known for its extensive editing capabilities, Photoshop allows photographers to perform intricate adjustments, such as retouching and layering, which can be particularly beneficial for correcting issues that arise in outdoor settings, like uneven lighting or distracting backgrounds.
Capture One: This software is favored by many professionals for its superior color correction tools and detailed editing features. Its ability to handle RAW files efficiently ensures that backpack photographers can extract the best quality from their images, especially in challenging lighting situations.
Affinity Photo: As a budget-friendly option, Affinity Photo offers many features similar to those found in Photoshop, including advanced selection tools and layer management. This makes it a great choice for backpack photographers looking for powerful editing options without the subscription model.
Snapseed: This mobile app is perfect for backpack photographers who need to make quick edits while on the trail. With its intuitive interface and various filters, Snapseed allows users to enhance their images easily and share them instantly on social media platforms.
Who Are the Influential Photographers Specializing in Backpack Photography?
Several influential photographers are known for their exceptional backpack photography that captures stunning landscapes and adventurous moments.
- Chris Burkard: Chris is renowned for his breathtaking surf and adventure photography, often taking his camera to remote locations.
- Annie Leibovitz: While primarily known for her portrait photography, Annie’s travel work often includes elements of backpack photography, showcasing diverse landscapes and cultures.
- Jimmy Chin: A professional climber and photographer, Jimmy captures the exhilarating intersection of adventure sports and stunning natural scenery.
- Elia Locardi: Elia specializes in landscape photography and is known for his vibrant images taken during his travels around the world.
- Daniel Kordan: Daniel focuses on capturing the beauty of nature and has gained a following for his enchanting landscape images taken during his journeys.
Chris Burkard’s work stands out for its emphasis on the connection between nature and adventure, often featuring surfers in remote settings. His ability to blend extreme sports with stunning visuals makes his backpack photography both captivating and motivational for aspiring photographers.
Annie Leibovitz, celebrated for her celebrity portraits, also has a keen eye for travel photography, utilizing her experiences to create compelling narratives in her images. Her ability to capture the essence of various cultures through her lens adds depth to her backpack photography portfolio.
Jimmy Chin’s background in climbing allows him to access some of the most breathtaking landscapes on Earth, translating those experiences into powerful photographs that inspire adventure. His work often emphasizes the thrill and beauty of the outdoors, making it relevant for both backpack photography and adventure sports enthusiasts.
Elia Locardi is distinguished for his mastery in landscape photography, often utilizing techniques such as long exposures and vibrant color palettes to showcase the beauty of nature. His dedication to traveling with just a backpack reflects a minimalist approach that resonates with fellow photographers seeking to explore the world.
Daniel Kordan’s photography is characterized by his artistic eye for composition and lighting, capturing nature in its most serene and breathtaking moments. His travels have taken him to various remote locations, where he employs his backpack photography skills to document the stunning landscapes he encounters.
What Techniques Do Notable Backpack Photographers Use?
Notable backpack photographers utilize various techniques to capture the best backpack photos.
- Composition Techniques: Effective composition techniques such as the rule of thirds or leading lines help create visually appealing images. Photographers often frame their subjects thoughtfully to guide the viewer’s eye and enhance the storytelling aspect of the photo.
- Lighting Manipulation: Mastery of natural light is crucial for backpack photographers, as it can dramatically affect the mood and quality of an image. They often shoot during golden hour, using the soft, warm light to illuminate their subjects and add depth to the landscape.
- Incorporating Motion: Capturing movement can add dynamism to backpack photos. Photographers often use slow shutter speeds to create a sense of motion, such as flowing water or moving clouds, which brings life to the backdrop of their subjects.
- Perspective and Angles: Experimenting with different perspectives and angles allows photographers to present their subject in unique ways. By shooting from low or high angles, or even tilting the camera, they create a fresh viewpoint that can make the backpack photo stand out.
- Use of Foreground Elements: Including foreground elements in a shot can add depth and context to the image. Backpack photographers often place rocks, flowers, or other natural features in the foreground to frame their subject and enhance the overall composition.
- Post-Processing Techniques: Editing plays a significant role in refining backpack photos. Photographers often use software to adjust exposure, contrast, and colors to ensure their images reflect the scene’s beauty while also highlighting the backpack and its features effectively.
How Can Learning From Them Improve Your Own Backpack Photography Skills?
Learning from the best backpack photography examples can significantly enhance your own skills by providing inspiration, technique insights, and practical tips.
- Composition Techniques: Analyzing how top photographers frame their shots can teach you about balance, symmetry, and the rule of thirds. By observing their use of foreground, middle ground, and background elements, you can improve your ability to create visually engaging images.
- Lighting Mastery: The best backpack photos often showcase an understanding of natural light. By studying how photographers utilize golden hour, shadows, and highlights, you can develop a keen eye for the best times to shoot and how to manipulate light for your advantage.
- Equipment Choices: Noting the gear used by successful backpack photographers can guide your own equipment decisions. Understanding which lenses, camera bodies, and accessories work best for specific scenarios can help you invest wisely in your photography kit.
- Storytelling Elements: Top backpack photographers often convey a strong narrative through their images. By examining how they capture emotions, interactions, and moments, you can learn to infuse your own work with storytelling techniques that resonate with viewers.
- Post-Processing Techniques: Learning about the editing styles of skilled photographers can enhance your post-processing skills. By understanding techniques like color grading, exposure adjustments, and cropping, you can refine your images to achieve a polished, professional look.
- Unique Perspectives: Observing the creative angles and viewpoints employed by others can inspire you to experiment with your own perspective. This can lead to more dynamic and interesting compositions, setting your work apart from the conventional shots.
- Planning and Preparation: The best backpack photographers often meticulously plan their shoots, considering factors like location, time of day, and weather. Learning from their approach can help you be better prepared, ensuring you capture the best possible images during your adventures.