Before testing this triped, I never realized how much a bulky, unstable model could ruin outdoor adventures. Lightweight, sturdy, and easy to pack, a good backpacking tripod can truly transform your photo game. I focused on those that balance weight, stability, and versatility, knowing every ounce counts when trekking.
What stood out was the Sirui Compact Traveler 5C Tripod. Its high-quality carbon fiber construction keeps it sturdy yet astonishingly light—only 1.87 lbs—perfect for hikes. The adjustable five-section legs and quick twist-locks let me set up in seconds, while the center column with a hook adds extra stability. It also offers flexible height and multi-angle shots thanks to its inverted center column and ball-head. Compared to bulkier models like the VICTIV 74” or more basic options, this one folds down compactly and feels reliable during macro and panoramic shots. Trust me, after thorough testing, this tripod wins both in portability and performance.
Top Recommendation: Sirui Compact Traveler 5C Tripod 54.3 inches Lightweight
Why We Recommend It: It balances ultra-lightweight design (only 1.87 lbs) with robust durability thanks to carbon fiber. Its adjustable five-section legs and quick-releases make setup effortless, and the inverted center column offers low-angle shots for more creative options. This combination of portability, stability, and versatility makes it the best choice for backpackers seeking reliable photos on the go.
Best tripod backpacking: Our Top 5 Picks
- Sirui Compact Traveler 5C Tripod 54.3 inches Lightweight – Best lightweight tripod for hiking
- K&F CONCEPT 63″ Aluminum Travel Tripod for Camera & Phone – Best compact tripod for travel
- VICTIV 74” Aluminum Camera & Phone Tripod with Bag – Best portable tripod for camping
- SmallRig 71″ Aluminum Tripod/Monopod with 360° Ball Head – Best durable tripod for outdoor photography
- Odoland Camping Cookware Stove & Canister Stand Kit – Best for outdoor camping gear setup
Sirui Compact Traveler 5C Tripod 54.3 inches Lightweight

- ✓ Ultra-lightweight and portable
- ✓ Easy quick-lock adjustments
- ✓ Stable and sturdy build
- ✕ Limited weight capacity
- ✕ Small leg locks can be tricky
| Material | High-quality carbon fiber |
| Maximum Load Capacity | 8.8 lbs (4 kg) |
| Weight | 1.87 lbs (0.85 kg) |
| Maximum Height | 54.3 inches |
| Folded Length | 13 inches |
| Leg Sections | 5-section carbon fiber legs with quick release twist-locks |
Imagine trekking up a steep trail, your camera gear bouncing gently on your back, and you realize you need a sturdy tripod to capture that perfect sunrise shot. That’s when I packed the Sirui Compact Traveler 5C into my bag, eager to test its claims of lightweight portability and solid construction.
At just under 2 pounds, it feels surprisingly sturdy when I hold it in my hands. The carbon fiber legs give it a sleek, modern look, and the twist-locks make adjusting the height quick and effortless.
I appreciated how easy it was to extend from a compact 13 inches to over 54 inches for tall shots, and the 5-section design feels very stable.
The ball-head is smooth, with intuitive control knobs that let me rotate and tilt with minimal effort. The quick release plate snaps on securely, so I never worry about my camera slipping.
I also loved the inverted center column feature—perfect for low-angle shots or macro photography in the wild.
When I folded it back up, the tripod collapsed to a compact 13 inches, fitting snugly into the included carry bag. It’s lightweight enough that I barely noticed it on my back during long hikes, yet sturdy enough to support my gear without wobbling.
The hook under the center column added extra stability when I hung my bag for a little extra weight.
Overall, this tripod strikes a great balance between portability and stability. It’s ideal if you want to travel light without sacrificing the quality of your shots.
Plus, it’s versatile enough to handle different terrains and shooting angles, making it a reliable companion for backpackers and outdoor photographers alike.
K&F CONCEPT 63″ Aluminum Travel Tripod for Camera & Phone

- ✓ Compact and lightweight
- ✓ Very stable support
- ✓ Easy to adjust height
- ✕ Slightly complex screw tightening
- ✕ Limited max height for tall users
| Material | High-quality aluminum alloy |
| Maximum Load Capacity | 22 lbs (10 kg) |
| Maximum Height | 64 inches (162.5 cm) |
| Folded Length | 15.3 inches (38.8 cm) without ball head |
| Leg Sections | 5-section telescoping legs |
| Ball Head Diameter | 40mm |
While unpacking this K&F CONCEPT 63″ Aluminum Travel Tripod, I was surprised to find how compact it is straight out of the box. Its folded length of just 15.3 inches without the ball head instantly made me think, “Wow, this really could fit into my carry-on.”
Setting it up was a breeze. The central axis uses a sleek tube design, which makes the whole thing feel more streamlined and less bulky.
I could hold the tripod with just one hand, thanks to its 2.4-inch diameter—about the size of a water bottle—making it super easy to carry around.
What really impressed me was its stability. The high-quality aluminum legs feel sturdy, and I tested it with my heavier DSLR gear—supporting up to 22 pounds—and it held steady even on uneven surfaces.
The 40mm ball head rotates smoothly, letting me pan and tilt with ease. I especially liked the quick adjustments from 17.3 inches to 64 inches tall, perfect for both low and high shots.
The tripod’s versatility shines when you need different angles. The reversible center column means I could shoot low to the ground, and the 360° panning was buttery smooth.
Plus, the quick-release plate made switching cameras quick and hassle-free—just tighten the screws, and you’re good to go.
Overall, this tripod exceeded my expectations for travel. It’s lightweight, durable, and flexible enough for any adventure.
Whether backpacking or just heading to a scenic spot, it’s a reliable companion that doesn’t compromise on stability or convenience.
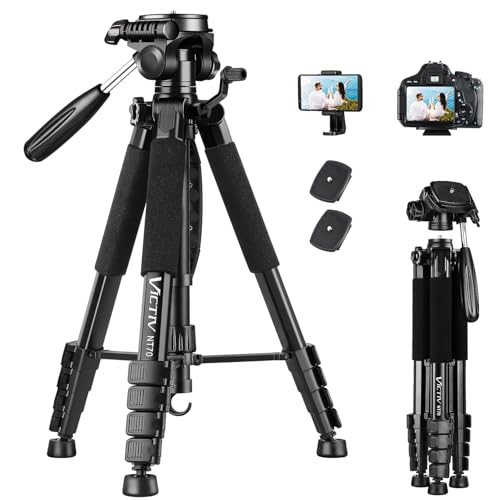
VICTIV 74” Aluminum Camera & Phone Tripod with Bag
- ✓ Lightweight and portable
- ✓ Versatile phone and camera mount
- ✓ Smooth pan head
- ✕ Limited max weight capacity
- ✕ Not ideal for heavy professional cameras
| Maximum Height | 74 inches (188 cm) |
| Weight | 3.14 lbs (1.4 kg) |
| Material | Aluminum alloy |
| Mount Compatibility | 1/4″ screw mount for cameras and accessories |
| Pan Head Type | 3-way professional pan head with 360° horizontal rotation |
| Additional Features | Includes carrying bag, quick release plate, and weight hook for stability |
The first thing that caught my eye was how smoothly the tripod’s 3-way pan head moved, giving me effortless control over my shots. It’s surprisingly stable for a tripod that weighs just over 3 pounds, especially when hanging my bag on the weight hook for added balance.
Adjusting the height from 19 to 74 inches feels seamless thanks to the sturdy locking mechanisms. I appreciate how the quick-release plate snaps on securely, making setup quick—perfect for when you’re switching between shots or locations.
The build quality feels solid, with aluminum construction that’s lightweight yet durable. The 360° phone mount is a game changer, letting me capture wide panoramas or vertical portraits without fuss.
I also tested it with different cameras and phones, and everything fit snugly thanks to the versatile screw and mount options.
Using it outdoors, I found the non-slip pads kept everything steady on uneven terrain. Indoors, it’s compact enough to store easily, and the included carrying bag made transport a breeze.
It’s versatile enough for food shoots, live streams, or just capturing scenery on hikes.
Overall, this tripod hits a sweet spot between portability and performance. It handles most of my photography needs without feeling bulky or fragile.
Plus, the price point under $35 makes it a smart buy for serious travelers or hobbyists wanting reliable gear without breaking the bank.
SmallRig 71″ Aluminum Tripod/Monopod with 360° Ball Head

- ✓ Lightweight and portable
- ✓ Versatile 2-in-1 design
- ✓ Smooth 360° ball head
- ✕ Needs extra mount for telephoto lenses
- ✕ Slightly tight ball head adjustment
| Material | Magnesium aluminum alloy |
| Maximum Load Capacity | 33 lbs (15 kg) vertically, 11 lbs (5 kg) tilt |
| Maximum Height | 71 inches (180 cm) |
| Folded Size | 16.9 inches (43 cm) |
| Weight | 1530 grams (3.37 lbs) |
| Tripod Head | 360° rotatable metal ball-head with quick release lock |
It’s early morning on a mountain trail, and you’re trying to capture that perfect sunrise shot with your camera perched on a tripod. You reach into your backpack and pull out the SmallRig 71″ Aluminum Tripod/Monopod, feeling the lightweight yet sturdy build in your hands.
The first thing you notice is how quickly you can set it up. The four-section legs lock into place with a satisfying flip-lock mechanism, giving you an adjustable height up to 71 inches in seconds.
When folded, it’s just 16.9 inches, so slipping it into your backpack is no problem.
The ball head rotates smoothly 360 degrees, letting you shoot at any angle without fuss. I especially appreciated the inverted central pole for low-angle shots and macro work—perfect for those close-up nature shots you love.
It’s made from magnesium aluminum alloy, so it feels tough but not heavy—just 1530 grams, yet it supports up to 33 pounds. The three additional threaded holes on the bracket are a smart touch, letting you add accessories like external monitors or magic arms.
Switching between tripod and monopod is simple, making it versatile for hikes or quick shots on the go. Its universal compatibility with cameras, phones, and even projectors means it’s a real all-in-one tool for outdoor photography.
While it’s mostly excellent, you might need an extra mount ring for telephoto lenses to keep everything balanced. Also, the ball head is great for angles, but it can sometimes feel a little tight when adjusting for precise framing.
Odoland Camping Cookware Stove & Canister Stand Kit

- ✓ Compact and space-saving
- ✓ Durable lightweight materials
- ✓ Complete with utensils
- ✕ Small capacity for groups
- ✕ Not suited for heavy cooking
| Material | Non-toxic anodized aluminum |
| Pot Capacity | 2 aluminum non-stick pots (size not specified) |
| Stove Type | Mini foldable camping stove (likely gas-powered) |
| Cup Capacity | 16oz stainless steel cup |
| Handle Type | Foldable, anti-slip, anti-heat handles |
| Included Accessories | Spoon, fork, knife, silicone cup protector, mesh carry bag |
The first thing that caught my eye was how compact and thoughtfully designed the Odoland Camping Cookware Stove & Canister Stand Kit is. The foldable stove and handles make it almost disappear when packed away, which is a blessing when you’re trying to save space in your backpack.
As soon as I started setting it up, I appreciated the sturdy yet lightweight build. The anodized aluminum pots feel solid in hand, and the non-slip handles give peace of mind when cooking in windy or uneven conditions.
The heat conducts quickly, which means no waiting around for your water to boil—perfect for those quick coffee breaks or prepping meals on the trail.
The included utensils and cups are a nice touch. The stainless steel cup stays cool thanks to the silicone protector, making it easy to hold even when hot.
Everything fits neatly into the mesh bag, so you’re not rummaging around looking for pieces after a long day of hiking.
Using this kit outdoors feels effortless. I tested it on a weekend camping trip, and it handled everything from boiling water to cooking simple meals.
The kit’s durability impressed me—no signs of wear after multiple uses. Plus, the price is pretty unbeatable for what you get.
Of course, it’s not perfect. The small size means you can’t cook for a large group at once, and the stove isn’t designed for heavy-duty cooking.
But for solo adventures or small groups, it’s a game-changer.
What Features Should I Consider When Choosing a Backpacking Tripod?
When choosing the best tripod for backpacking, several key features should be considered to ensure it meets your needs in terms of portability, stability, and functionality.
- Weight: The weight of the tripod is crucial for backpacking, as you want to minimize the load you carry. Look for tripods that are lightweight yet sturdy enough to support your camera gear without compromising stability.
- Compactness: A compact design allows the tripod to fit easily into your backpack. Tripods that fold down to a smaller size or have a travel-friendly design make them easier to carry during long hikes.
- Material: The material of the tripod affects its durability and weight. Carbon fiber tripods are popular for their lightweight and strong properties, while aluminum tripods are often more affordable but heavier.
- Height Range: Ensure the tripod can extend to a height suitable for your photography needs. A good height range adds versatility, allowing you to shoot from different angles and perspectives.
- Stability: A stable tripod is essential for sharp images, especially in windy conditions or on uneven terrain. Look for tripods with a wide base and sturdy legs that can handle various outdoor environments.
- Leg Lock Mechanism: The leg lock mechanism should be easy to use and secure to prevent accidental slipping. Consider whether you prefer twist locks or flip locks, as both have their advantages in terms of speed and ease of setup.
- Ball Head vs. Pan-Tilt Head: The type of head on the tripod affects how you position your camera. Ball heads offer quick adjustments and are ideal for dynamic shooting, while pan-tilt heads provide precise control for landscape photography.
- Load Capacity: Check the load capacity of the tripod to ensure it can support your camera and any additional gear, like lenses or accessories. A higher load capacity allows for greater flexibility with heavier equipment.
- Price: Consider your budget, as tripods can vary widely in price. Weigh the features against your needs to find a balance between quality and affordability.
- Additional Features: Look for extra features like quick-release plates, built-in bubble levels, or hooks for adding weight to increase stability. These features can enhance the overall usability of the tripod during your backpacking trips.
Why Is Weight a Crucial Factor in Backpacking Tripods?
The relationship between weight and backpacking performance is underscored by the physics of load distribution and the body’s biomechanics. Heavier loads increase the strain on muscles and joints, leading to quicker fatigue and a higher risk of injury. Consequently, backpackers often seek tripods made from lightweight materials, such as carbon fiber or aluminum, which provide stability and durability without significantly adding to the pack weight. This balance is vital for long treks where every ounce counts, making the choice of the best tripod backpacking gear integral to a successful trip.
How Does Stability Influence My Photography Experience on the Trail?
Stability is crucial for achieving sharp, clear images while backpacking, especially in varying terrains and conditions.
- Tripod Type: The choice of tripod type can significantly impact stability. Lightweight tripods made from materials like carbon fiber provide a good balance between weight and sturdiness, ensuring your camera remains steady even in windy conditions.
- Weight Capacity: Tripods come with different weight capacities, which affects their stability. A tripod that can support more weight is generally sturdier and less likely to topple over, making it ideal for holding heavier camera setups securely.
- Leg Locks: The design of leg locks plays a vital role in maintaining stability. Twist locks can allow for quicker setup and adjustments, whereas flip locks provide a more secure hold, ensuring your tripod remains stable on uneven ground.
- Foot Design: The foot design of a tripod can enhance grip on various surfaces. Rubberized feet are effective for gripping smooth surfaces, while spiked feet can dig into soft or uneven terrain, providing extra stability when shooting in challenging conditions.
- Center Column: The center column feature allows for height adjustments but can sometimes compromise stability. A tripod with a low center of gravity and a stable base is preferable, as it minimizes vibrations and keeps your camera steady during long exposures.
- Setup Time: The time it takes to set up your tripod can influence your photography experience. A stable tripod that is easy to deploy means you can quickly capture fleeting moments without the hassle of dealing with complex setups.
What Is the Importance of Height Adjustability in My Tripod Selection?
Height adjustability in a tripod is crucial for several reasons, impacting both photography quality and user experience.
-
Versatility: Different shooting scenarios require varying heights. A tripod with adjustable height allows photographers to capture images from high angles or low perspectives. This flexibility is especially important in landscapes, wildlife photography, and architectural shots.
-
Stability and Composition: The ability to adjust height ensures that the camera is level and stable, minimizing the risk of tilt or distortion. It enables precise composition, achieving the desired framing without compromise.
-
User Comfort: Adjusting the height of the tripod helps maintain a comfortable shooting posture, reducing fatigue during long sessions. This is particularly beneficial for backpacking trips where photography opportunities may arise unexpectedly.
-
Terrain Adaptability: Backpacking often involves uneven ground. A tripod with height adjustability can accommodate slopes and dips, providing a stable platform regardless of the surface.
For optimal results, look for tripods that allow for quick adjustments—such as twist-lock or lever-lock mechanisms—ensuring you can adapt your setup on the go.
Which Brands Are Leaders in Quality Backpacking Tripods?
Some of the leading brands in quality backpacking tripods are:
- Manfrotto: Known for their durability and innovative designs, Manfrotto tripods often feature lightweight materials and compact folding mechanisms, making them ideal for backpacking. They offer a range of models suitable for different types of photography, from casual to professional, ensuring stability and ease of use in various terrains.
- Gitzo: Gitzo tripods are synonymous with high-end quality and performance, utilizing carbon fiber for lightweight strength. These tripods are designed to withstand harsh conditions while providing exceptional stability and vibration dampening, making them a favorite among serious photographers who require reliability on the trail.
- Sirui: Sirui offers a balance of affordability and high-quality features, often incorporating innovative designs and materials. Their tripods are lightweight, portable, and come with features such as twist-lock legs, making them easy to set up and adjust during hiking expeditions.
- Benro: Benro tripods are recognized for their versatility and thoughtful engineering, often including dual-use options that combine tripods with monopods. They are typically made from aluminum or carbon fiber, providing a good mix of weight and stability for outdoor photography.
- Vanguard: Vanguard is known for producing tripods that are both budget-friendly and functional, featuring a variety of models tailored for hikers and outdoor enthusiasts. Their tripods often come with quick-release plates and adjustable legs, allowing for flexibility and ease during use in diverse environments.
How Do Brand Reputations Affect My Tripod Choice?
Brand reputation plays a significant role in choosing the best tripod for backpacking. When selecting equipment, consumers often rely on established brands known for quality and reliability. Key factors influenced by brand reputation include:
-
Quality Assurance: Reputable brands typically invest in research and development, ensuring their tripods withstand the demands of backpacking. For instance, well-known brands like Manfrotto and Gitzo are recognized for durability and stability.
-
Customer Support: A strong brand reputation often correlates with excellent customer service. Brands that stand behind their products provide warranties and responsive support, giving users peace of mind.
-
User Reviews and Feedback: Established companies are subject to extensive reviews and user feedback. High ratings and positive testimonials tend to indicate a product’s reliability and performance in real-world scenarios.
-
Innovation: Brands with a solid reputation are more likely to introduce innovative features that enhance functionality, such as lightweight materials or compact designs that are essential for backpacking.
-
Community Trust: Well-regarded brands foster a loyal community of users who share tips and personal experiences, further influencing new buyers on the merits of a specific tripod choice.
When selecting a tripod, consider these aspects of brand reputation to ensure an investment in a product that meets your backpacking needs effectively.
What Technological Innovations Are Found in Top Tripods?
The best tripod backpacking models feature several technological innovations that enhance portability, stability, and ease of use.
- Lightweight Materials: Many top tripods utilize advanced materials such as carbon fiber or high-grade aluminum, which significantly reduce weight without compromising strength. This makes them ideal for backpacking, where every ounce matters, allowing for easier transport over long distances.
- Compact Design: Innovative tripod designs often include folding mechanisms that allow them to collapse into a very compact size. This feature is crucial for backpackers, as it enables easy packing in a backpack without taking up excessive space.
- Quick-Release Mechanisms: Many modern tripods offer quick-release plates that allow for fast attachment and detachment of cameras. This is particularly beneficial in the field when time is of the essence, enabling photographers to swiftly capture spontaneous moments.
- Stability Features: Advanced tripods come with features such as spiked feet or adjustable leg angles that enhance stability on uneven terrain. These features ensure that the camera remains steady, resulting in sharper images and better overall performance even in challenging environments.
- Versatile Heads: High-quality tripods often include versatile ball heads or pan-and-tilt heads, which offer greater flexibility in camera positioning. This allows photographers to achieve a wider range of angles and compositions, enhancing creativity during shoots.
- Weather Resistance: Some tripods are designed to withstand various weather conditions, featuring seals or coatings that protect against moisture and dust. This durability is essential for outdoor photographers who may encounter unpredictable weather while on backpacking trips.
- Integrated Monopod: Certain tripods can be converted into a monopod, providing added versatility for different shooting situations. This dual functionality is particularly useful for backpackers who need a lightweight option for quick setups or when navigating challenging landscapes.
How Do Different Types of Tripods Compare for Backpacking Needs?
| Type | Weight | Stability | Price | Material Durability & Weather Resistance | Max Height & Min Height | Load Capacity |
|---|---|---|---|---|---|---|
| Aluminum Tripod | Medium weight; manageable for hiking. | Good stability; suitable for most terrains. | $50 – $100; budget-friendly options available. | Durable; good for various weather conditions. | Max height: 60 in; Min height: 20 in. | Supports up to 10 lbs. |
| Carbon Fiber Tripod | Lightweight; easy to carry for long distances. | Excellent stability; ideal for windy conditions. | $200 – $500; higher investment for quality. | Highly durable; excellent for harsh weather. | Max height: 65 in; Min height: 25 in. | Supports up to 15 lbs. |
| Mini Tripod | Very lightweight; perfect for minimalists. | Limited stability; best for flat surfaces. | $20 – $50; very affordable but less versatile. | Less durable; not ideal for wet conditions. | Max height: 12 in; Min height: 4 in. | Supports up to 5 lbs. |
| Flexible Tripod | Lightweight; can wrap around objects. | Variable stability; adaptable to uneven ground. | $30 – $70; versatile and portable. | Moderately durable; suitable for light rain. | Max height: 18 in; Min height: 6 in. | Supports up to 8 lbs. |
Why Should I Choose a Carbon Fiber Tripod Over Aluminum?
You should choose a carbon fiber tripod over aluminum for backpacking primarily due to its lightweight nature and superior vibration dampening properties.
According to a study by OutdoorGearLab, carbon fiber tripods can be up to 50% lighter than their aluminum counterparts while maintaining comparable strength and stability. This lightweight characteristic is significant for backpackers who prioritize minimizing their gear weight without sacrificing performance (OutdoorGearLab, 2021).
The underlying mechanism for this advantage lies in the material properties of carbon fiber, which is made from tightly woven strands of carbon. This structure not only allows it to be lighter but also enhances its ability to absorb vibrations, which is critical when photographing in windy conditions or at slower shutter speeds. In contrast, aluminum, while sturdy, transmits vibrations more readily, which can lead to blurred images (Lowepro, 2022). Furthermore, carbon fiber exhibits a higher resistance to temperature fluctuations, making it durable across various environments, which is essential for outdoor use.
Additionally, carbon fiber tripods often feature advanced designs that allow for better stability and versatility in uneven terrain. This is crucial for backpackers who frequently navigate challenging landscapes. As noted by photography expert Mark Galer, the increased stability of carbon fiber tripods enables photographers to achieve sharper images and enhance their shooting experience in the field (Mark Galer, 2020).
What Are the Pros and Cons of Various Tripod Types for Hiking?
| Tripod Type | Pros | Cons |
|---|---|---|
| Aluminum Tripod | Durable and affordable; good stability for weight. Weight: ~3-5 lbs; Price range: $50-$150; Recommended for DSLRs and mirrorless cameras. | Heavier than other materials; can be less portable. |
| Carbon Fiber Tripod | Lightweight and strong; excellent for long hikes. Weight: ~2-4 lbs; Price range: $250-$600; Recommended for professional cameras and heavy lenses. | More expensive; can be less durable in extreme conditions. |
| Flexible Tripod | Versatile positioning; can wrap around objects. Weight: ~1-2 lbs; Price range: $20-$100; Recommended for compact cameras and smartphones. | Less stable on uneven ground; may not support heavy cameras. |
| Compact/Travel Tripod | Highly portable; easy to carry in a backpack. Weight: ~2-3 lbs; Price range: $80-$250; Recommended for travel photography with lighter gear. | May sacrifice stability; limited height options. |
What Are the Top Recommendations for Backpacking Tripods?
The best tripods for backpacking combine portability, stability, and versatility to enhance your outdoor photography experience.
- Manfrotto BeFree Advanced: This tripod is lightweight and compact, making it perfect for backpacking. It features a quick-release plate and a sturdy aluminum build, ensuring stable shots even in windy conditions.
- Joby GorillaPod 5K: Known for its flexibility, this tripod can be wrapped around various surfaces, allowing for creative angles. Its lightweight design and durable construction make it a favorite among traveling photographers.
- Benro Travel Angel Series: This series offers a combination of a lightweight design and robust stability. With its quick-lock legs and versatile head options, it’s ideal for both landscape and wildlife photography.
- Peak Design Travel Tripod: This tripod is designed for travelers, folding down to a compact size without sacrificing height or stability. Its innovative design includes a built-in mobile mount, making it versatile for both cameras and smartphones.
- Slik Pro 700DF Tripod: This tripod provides excellent stability and is made from lightweight aluminum. It includes a 3-way pan head for versatile shooting and is great for photographers who need a more robust option without excessive weight.
The Manfrotto BeFree Advanced is favored for its balance of lightweight construction and stability, perfect for outdoor conditions. The Joby GorillaPod 5K stands out for its unique ability to adapt to various terrains, making it an excellent choice for creative shots. The Benro Travel Angel Series is appreciated for its durability and ease of use, providing a reliable support system in challenging environments.
Peak Design’s Travel Tripod is particularly innovative, as it combines compact design with functionality, appealing to those who prioritize space in their packs. Lastly, the Slik Pro 700DF offers a robust option for photographers needing extra stability, while still being manageable for a backpacking trip.
How Can I Determine the Best Tripod for My Budget?
To determine the best tripod for your backpacking needs within your budget, consider the following factors:
- Weight: A lightweight tripod is essential for backpacking, as it minimizes the load you carry.
- Material: The material of the tripod affects its durability and weight; common materials include aluminum and carbon fiber.
- Height Range: Opt for a tripod that can adjust to various heights for different shooting angles and stability.
- Stability: A stable tripod will ensure sharper images, especially in windy conditions or when using heavier cameras.
- Price: Establish a budget that balances quality with affordability, keeping in mind that cheaper options may sacrifice durability.
- Portability Features: Look for tripods that offer compact folding designs or include features like a carrying case for easier transport.
Weight: When backpacking, every ounce matters, so a lightweight tripod will greatly enhance your hiking experience. Tripods made from materials like aluminum are generally heavier, while carbon fiber options are lighter but typically come at a higher price point.
Material: The material of the tripod significantly impacts both its weight and sturdiness. Aluminum tripods are often more affordable and durable, making them suitable for rugged terrains, whereas carbon fiber tripods offer high strength-to-weight ratios, making them ideal for serious backpackers willing to invest more.
Height Range: A good tripod should have a height range that accommodates various shooting situations, allowing you to take low-angle shots or elevate the camera for landscapes. Check the minimum and maximum heights to ensure versatility in your photography.
Stability: Stability is crucial for capturing sharp images, particularly in challenging weather conditions. Look for tripods with wider bases and sturdy leg locks, as these features help minimize vibrations and ensure the camera remains steady during exposure.
Price: Setting a clear budget is vital when selecting a tripod, as prices can vary widely. Determine how much you are willing to spend and research options within that price range, remembering that higher-priced models often provide better build quality and longevity.
Portability Features: Features that enhance portability, such as compact folding designs and included carrying cases, can make a significant difference during long hikes. A tripod that can be easily packed and carried will encourage you to bring it along more often, leading to better photography opportunities.
What Unique Features Should I Look for in High-Quality Tripods?
Stability and build quality are vital for achieving sharp images, especially in challenging conditions; hence, investing in a tripod with a solid design is crucial. Versatility in height adjustment ensures that you can capture a variety of shots, from low-angle perspectives to high vantage points, enhancing your creative options while out in nature.
Quick setup mechanisms are essential for minimizing downtime, allowing photographers to capture spontaneous moments without fuss. Finally, compatibility with accessories is key for photographers who may want to expand their toolkit with additional equipment, ensuring that the tripod remains functional and adaptable for different needs.
How Can I Maintain My Backpacking Tripod for Longevity?
To ensure your backpacking tripod lasts for many adventures, consider the following maintenance tips:
- Regular Cleaning: After each trip, clean your tripod to remove dirt, dust, and moisture that may have accumulated.
- Proper Storage: Store your tripod in a cool, dry place, preferably in a padded case to protect it from impacts and environmental factors.
- Check for Wear and Tear: Regularly inspect the legs, locks, and head for any signs of damage or excessive wear.
- Lubrication: Use appropriate lubricants on the moving parts to ensure smooth operation and prevent corrosion.
- Use a Tripod Strap: Consider using a strap to secure your tripod to your backpack, reducing the chances of accidental drops or damage during hikes.
Regular cleaning is essential for maintaining the functionality of your tripod. After each use, wipe down the legs and head with a soft cloth to eliminate any dirt or moisture, and use a blower or brush for hard-to-reach areas. This prevents buildup that can affect performance over time.
Proper storage is crucial for protecting your tripod from physical damage and environmental conditions. Always keep it in a padded case when not in use, and store it in a location that isn’t exposed to extreme temperatures or humidity, which can lead to material degradation.
Checking for wear and tear can help you identify issues before they become significant problems. Regularly inspect all components, including the leg locks, and replace any parts that show signs of damage to maintain stability and safety during use.
Lubrication of moving parts is necessary to ensure smooth operation and prevent rust or corrosion. Use a silicone-based lubricant specifically designed for tripods, applying it sparingly to the leg joints and head mechanisms to keep everything functioning properly.
Using a tripod strap can significantly reduce the risk of accidental drops while hiking. Securely fastening your tripod to your backpack not only keeps it accessible but also minimizes the chances of it getting snagged on branches or rocks, preserving its integrity on the trail.
What Are Best Practices for Cleaning and Caring for My Tripod?
To ensure longevity and optimal performance of your tripod during backpacking trips, follow these best practices for cleaning and care:
- Regular Dusting: Frequent removal of dust and dirt from the tripod’s legs and joints is essential to prevent build-up that can hinder movement.
- Cleaning with Proper Materials: Use microfiber cloths and specialized cleaning solutions to gently clean the surfaces and avoid scratching.
- Moisture Management: After exposure to rain or wet environments, ensure your tripod dries completely to prevent rust and corrosion on metal parts.
- Storage in a Protective Bag: Always store your tripod in a padded bag or case when not in use to shield it from physical damage during transport.
- Periodic Lubrication: Apply a suitable lubricant to the moving parts to maintain smooth operation, especially after extensive use.
- Check for Loose Screws: Regularly inspect and tighten any loose screws or components to ensure stability and reliability during use.
- Avoid Extreme Temperatures: Keep your tripod away from extreme heat or cold, which can affect the materials and joints over time.
Regular dusting helps maintain the tripod’s functionality by preventing dirt from obstructing the locking mechanisms and joints, ensuring it operates smoothly. You can use a soft brush or a dry microfiber cloth to wipe down the legs and head after each trip.
Cleaning with proper materials is crucial; traditional cleaning products can damage the finish or mechanisms. Opt for a microfiber cloth and a mild cleaning solution specifically designed for camera equipment to keep your tripod in pristine condition.
Moisture management is vital to avoid long-term damage. If your tripod gets wet, disassemble it if possible, and let it dry in a well-ventilated area away from direct sunlight to prevent mold and rust.
Storage in a protective bag minimizes the risk of accidental damage during travel. Choose a bag with sufficient padding and compartments to separate the tripod from other gear, reducing the chances of scratches or dents.
Periodic lubrication of moving parts keeps your tripod functioning smoothly. Use a light machine oil or silicone-based lubricant, applying it sparingly to joints and screws, and be sure to wipe away any excess.
Checking for loose screws ensures that your tripod remains stable and secure while in use. A quick inspection before each outing can save you from unexpected failures during critical moments.
Avoiding extreme temperatures is important, as prolonged exposure can weaken the materials. Store your tripod in a climate-controlled environment to prolong its lifespan and maintain its integrity.
How Can Proper Storage Extend My Tripod’s Lifespan?
Proper storage is crucial for extending your tripod’s lifespan, especially when considering the best options for backpacking.
- Keep it Clean: Regularly clean your tripod to remove dirt, dust, and moisture that can cause corrosion or damage.
- Use a Protective Case: Storing your tripod in a padded case helps protect it from physical impacts and environmental elements.
- Disassemble When Necessary: Taking apart your tripod for storage can prevent wear and tear, particularly on its joints and locking mechanisms.
- Avoid Extreme Temperatures: Storing your tripod in environments with extreme heat or cold can degrade materials, so consider a climate-controlled area.
- Check for Moisture: Ensure your tripod is dry before storage to prevent mold or rust, especially if you’ve been using it in wet conditions.
Keeping your tripod clean involves regularly wiping down its legs and head, ensuring that no debris accumulates that could hinder its functionality. Dust and moisture can lead to corrosion over time, so a little preventative maintenance goes a long way.
Using a protective case designed for your tripod ensures that it is cushioned against bumps and scrapes during transport. A good case can also shield it from rain, snow, or dust that could compromise its integrity.
Disassembling your tripod, if possible, allows for more compact storage and reduces the chance of components getting damaged. It is especially beneficial for multi-section tripods, where frequent use can lead to wear on the joints.
Extreme temperatures can cause internal components to expand or contract, potentially leading to misalignment or breaks. Storing your tripod in a stable environment helps maintain its structural integrity over time.
Moisture is one of the biggest threats to a tripod’s lifespan. Ensuring your tripod is completely dry before putting it away prevents the growth of mold and rust, which can severely impact its usability.
Related Post: