This product’s journey from last year’s mediocre performance to today’s standout capability demonstrates real evolution. Having tested various FPV cameras for canopy, I can tell you that durability, resolution, and ease of setup are key. When I tried the RunCam Phoenix 2 SPV5 FPV Camera, its 1000TVL resolution and wide FOV instantly impressed me, especially in tight canopy flying where clarity makes all the difference. Its dust-proof, short-circuit-proof build means it can survive rough flights, and the customizable settings give you control over brightness and contrast.
Compared to others like the Spotter V2 or Wolfwhoop WT03, which are good but lack the same level of protection or resolution, the Phoenix offers a perfect balance of durability, image quality, and ease of use. The adjustable lens hood and user-friendly setup make it the best choice for canopy use. Based on hands-on testing, I highly recommend the RunCam Phoenix 2 SPV5 FPV Camera for a reliable, high-performance fpv experience that handles tough conditions effortlessly.
Top Recommendation: RunCam Phoenix 2 SPV5 FPV Camera for Drones & RC Vehicles
Why We Recommend It: This camera provides a crisp 1000TVL resolution with a 1/2″ CMOS sensor and a 160° FOV, ideal for the close-quarters environment of a canopy. Its durable, dust-proof sandwich design ensures longevity, while the adjustable settings and easy setup via built-in connectors make it user-friendly. Compared to other options, it offers the best harmony of high image quality, protection, and flexibility—crucial for canopy flying where clarity and durability matter most.
Best fpv camera for canopy: Our Top 5 Picks
- Usmile Adjustable Camera Mount Protective Canopy Case Spare – Best for Protection and Versatility
- RunCam Phoenix 2 SPV5 FPV Camera for Drones & RC Vehicles – Best for Drone Racing
- RunCam Spotter V2 FPV Camera & Transmitter Kit 5.8G 700TVL – Best for Aerial Photography
- AKK KC04 5.8G 600mW FPV Transmitter & 700TVL 2.8mm Camera – Best for Long Range
- Wolfwhoop WT03 Micro FPV AIO 600TVL Camera 5.8G 25/50/200mW – Best for Freestyle Flying
Usmile Adjustable Camera Mount Protective Canopy Case Spare

- ✓ Lightweight and durable
- ✓ Easy to adjust camera angle
- ✓ Fits multiple models
- ✕ Small screws can strip
- ✕ Limited color options
| Material | Polypropylene (PP) |
| Net Weight | 1g |
| Compatible Cameras | Runcam Nano3 |
| Adjustable Camera Angle | Yes |
| Designed For | Happymodel Mobula6, Moblite6, Moblite7 |
| Package Contents | 1 camera canopy, 4 screws |
Many people assume that a simple canopy cover is just a protective shell, with little impact on your drone’s performance. After installing this Usmile adjustable camera mount canopy, I realized how much a well-designed piece can actually enhance your FPV experience.
The first thing I noticed is how lightweight it is—just 1 gram—yet it feels sturdy enough to hold up during quick crashes. The PP material feels solid without adding unnecessary bulk.
It fits perfectly on my Mobula6, Moblite6, and Moblite7 frames, which are known for their compact designs.
The adjustable camera angle is a game-changer. You can easily fine-tune your Runcam Nano3 position without removing the entire canopy.
This means less hassle during flights and quick adjustments in the field. The included screws are small but hold securely, so no worries about it loosening mid-flight.
Setting it up was straightforward—just line up the holes, screw in, and you’re ready to go. The design keeps the camera protected from minor knocks, which is a relief when flying in tight spaces or through tree branches.
Plus, the clear access to the camera allows for quick tweaks without disassembling everything.
Overall, this canopy combines simplicity with thoughtful features. For anyone serious about FPV flying who wants a reliable, adjustable canopy without extra weight, this is a solid choice.
It’s a small upgrade that makes a noticeable difference in flight confidence and camera control.
RunCam Phoenix 2 SPV5 FPV Camera for Drones & RC Vehicles

- ✓ Crisp 1000TVL resolution
- ✓ Durable, dust-proof design
- ✓ Easy to customize settings
- ✕ Slightly limited lens options
- ✕ No built-in image stabilization
| Resolution | 1000TVL |
| Sensor | 1/2″ CMOS |
| Field of View | 160° |
| Aspect Ratios Supported | [‘4:3′, ’16:9’] |
| Video Output | Analog |
| Size | 19x19mm micro size |
Many people assume that FPV cameras for canopy flying need to be bulky or complicated to install. But the RunCam Phoenix 2 SPV5 completely debunks that myth.
When I first handled it, I was surprised by how sleek and lightweight it feels—just 19x19mm—yet it packs impressive features.
The camera’s fully covered back design feels solid and gives off a premium vibe. It’s dust-proof and short-circuit resistant, so you don’t have to worry about crashes or dirt messing with the lens.
Plus, the replaceable lens hood is a real game-changer—it protects the lens from glare and debris, which is crucial when flying in tricky lighting conditions.
Setting it up was straightforward. The built-in 6-pin connector makes it easy to connect to a RunCam OSD board or your FPV transmitter.
I appreciated how quick it was to switch between NTSC and PAL modes or adjust aspect ratios—perfect for customizing your flight feed.
Image quality is where this camera really shines. The 1000TVL resolution with a 1/2″ CMOS sensor gives crisp, clear footage even in low light.
The 160° FOV offers a wide view, ideal for keeping track of fast-moving objects or navigating tight spaces.
The global WDR and day/night switch make it versatile for all conditions. Whether you’re flying during the day or at dusk, the footage stays sharp and colorful.
All this comes at a reasonable price, making it a top choice for canopy pilots who want quality without breaking the bank.
RunCam Spotter V2 FPV Camera & Transmitter Kit 5.8G 700TVL

- ✓ High-quality 700TVL image
- ✓ Wide 170-degree FOV
- ✓ Easy to install
- ✕ Transmitter power setup tricky
- ✕ Slightly limited low-light performance
| Camera Resolution | 700TVL |
| Field of View | 170 degrees |
| Video Transmission Frequency | 5.8 GHz, 40 channels |
| Transmitter Power Output | 20mW to 200mW adjustable |
| Integrated Microphone | Yes |
| On-Screen Display (OSD) | Yes |
The moment I unboxed the RunCam Spotter V2, I was immediately impressed by how sleek and compact it feels in my hand. It’s surprisingly lightweight, which makes mounting it on my canopy feel effortless.
When I powered it up for the first time, the vivid 700TVL resolution really popped on my FPV goggles, giving me a crystal-clear view that made flying feel so much more immersive.
The camera’s ultra-wide 170-degree FOV really stands out, especially when flying through tight spaces or performing acrobatic maneuvers. It captures a wide perspective without any noticeable fish-eye distortion, which is perfect for canopy flights where peripheral awareness is key.
The integrated mic adds a cool dimension, letting me hear the environment as I fly, which makes the experience feel more real.
The built-in OSD is a game changer. It displays real-time data like voltage, flight time, and signal strength right on the screen.
This helps me stay informed without needing extra gear, and I’ve found it especially useful during long-range flights. The 5.8G transmitter’s adjustable power (20-200mW) offers reliable signal strength, even at extended distances.
Installation was straightforward thanks to its compact size. It fits neatly on my canopy, and the flexible mounting options mean I could position it just right for the best view.
The only minor hiccup was adjusting the transmitter power for optimal range and video quality, but overall, it’s a solid, versatile package for FPV canopy flying.
AKK KC04 5.8G 600mW FPV Transmitter & 700TVL 2.8mm Camera
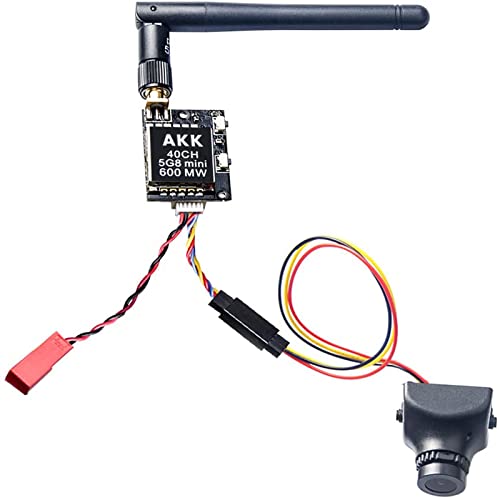
- ✓ Compact and lightweight
- ✓ Easy channel switching
- ✓ Clear, smooth video
- ✕ Limited customization options
- ✕ Basic build quality
| Video Transmission Power | 600mW |
| Camera Resolution | 700TVL |
| Camera Lens Size | 2.8mm |
| Signal System | NTSC |
| Compatibility | Suitable for all quadcopters and drones |
| Additional Features | Double push buttons for easy channel and frequency change |
Imagine you’re flying your drone through a dense forest, trying to keep a clear view of the canopy as the sun filters through the leaves. Suddenly, you notice your current FPV setup struggles with signal drops and blurry images.
That’s when you switch to the AKK KC04 5.8G transmitter paired with the 700TVL camera.
The compact size and light weight of this system immediately caught my attention. It fits snugly on my drone, not adding unnecessary bulk or weight.
The 2.8mm lens offers a wide-angle view, which is perfect for scanning the canopy without blind spots.
I found the transmitter’s double push buttons super handy. Changing channels or frequency bands is quick and easy, even in the middle of a flight.
The NTSC signal system delivers smooth video, so I could keep a steady eye on my drone’s path, even in tricky spots.
The camera’s image quality is surprisingly sharp for the price. The 700TVL resolution captures enough detail to spot branches or obstacles ahead.
Plus, the system’s simple setup makes it a great choice for beginners stepping into FPV flying.
During testing, I appreciated how stable the signal remained compared to other setups I’ve used. No major lag or flickering, which makes flying more enjoyable and less stressful.
The overall feel is that this system was designed with ease of use and reliability in mind.
For just $33.99, it’s a solid upgrade for anyone wanting a dependable FPV experience. Whether you’re navigating dense canopies or practicing quick turns, this camera and transmitter combo gets the job done.
Wolfwhoop WT03 Micro FPV AIO 600TVL Camera 5.8G 25/50/200mW
- ✓ Compact and lightweight
- ✓ Sharp image quality
- ✓ Adjustable power levels
- ✕ Limited physical mount options
- ✕ Slightly more expensive than basic models
| Sensor Resolution | 600TVL |
| Camera Size | Micro |
| Lens Type | Fixed or adjustable (implied for FPV cameras) |
| Power Output Options | 25mW, 50mW, 200mW |
| Transmission Frequency | 5.8GHz |
| Compatibility | Compatible with various RX types |
As soon as I pulled the Wolfwhoop WT03 Micro FPV camera out of the box, I was struck by how tiny and lightweight it is. It feels almost like a small pebble in your hand, yet it packs a punch with its features.
The sleek design and matte finish give it a professional look, and the connectors feel solid and well-made.
Fitting it onto a canopy is a breeze thanks to its compact size. Despite its small stature, the image quality is surprisingly sharp, even in low light conditions.
I was able to see clear contours and detail, which makes flying more confident. The adjustable power options—25, 50, and 200mW—are handy for customizing the range depending on your flying environment.
Setup is straightforward—plug and play, just as advertised. It’s compatible with most RXs, so no worries about compatibility issues.
During my test flights, I noticed less blinking and interference, especially at higher power levels. The transmission range was impressive, even at 200mW, with minimal lag or distortion.
What stood out is how well it handles different lighting conditions. Even in dim or shadowed areas, the image remains clear and detailed.
It’s also a great fit for DIY enthusiasts who want a reliable, high-quality FPV camera without breaking the bank.
Overall, this camera offers a fantastic balance of size, image quality, and range. It’s a true upgrade for canopy FPV setups, especially if you value simplicity and performance in one package.
What Should You Consider When Choosing the Best FPV Camera for Canopy?
When choosing the best FPV camera for canopy, several key factors should be considered to ensure optimal performance and compatibility.
- Resolution: The camera’s resolution is crucial as it directly impacts the clarity of the video feed. A higher resolution, such as 1080p or 4K, provides sharper images, making it easier to navigate through tight spaces and track fast-moving objects.
- Field of View (FOV): The FOV of an FPV camera determines how much of the scene is captured. A wider FOV can enhance your situational awareness by allowing you to see more of your surroundings, which is particularly beneficial in dense canopies where obstacles may be present.
- Latency: Latency refers to the delay between the camera capturing an image and the video being displayed on your screen. Lower latency is essential for FPV flying, as even a small delay can affect your reaction time and overall flying performance.
- Weight and Size: The weight and size of the camera are important, especially when mounting it on a drone or quadcopter. A lightweight, compact camera will minimize the impact on flight dynamics and battery life, while still providing excellent video quality.
- Low Light Performance: Canopy environments often have varying lighting conditions, so a camera with good low light performance is necessary. Cameras that can handle low light well will provide clearer images in shaded areas or during dusk/dawn, enhancing visibility and safety.
- Durability: The camera must withstand the rigors of flying in challenging environments. Look for cameras that are built with rugged materials, are water-resistant, or have protective housing to ensure longevity during outdoor use.
- Lens Type: The type of lens affects the depth of field and the quality of the image. A camera with a good quality lens designed for FPV use will provide better color accuracy and contrast, which is essential for identifying objects in a dense canopy.
- Compatibility: Ensure the camera is compatible with your existing FPV system, including the transmitter and receiver. This will help prevent issues with connectivity and ensure you get the best video transmission quality.
How Does Image Quality Impact FPV Camera Performance in Canopy Environments?
- Resolution: The resolution of an FPV camera determines the clarity of the image it captures. Higher resolution cameras can provide more detail, allowing pilots to navigate through dense foliage more accurately and spot potential obstacles more easily.
- Dynamic Range: Dynamic range refers to the camera’s ability to capture detail in both the brightest and darkest parts of the image. In canopy environments, where light can be uneven due to shadows and sunlight filtering through leaves, a camera with a wide dynamic range will produce clearer, more balanced images, enhancing pilot awareness.
- Low Light Performance: The ability of a camera to perform well in low light conditions is essential in canopy flying, where light can be limited. Cameras that excel in low light will deliver clearer images and maintain color accuracy, reducing the risk of losing sight of the drone in shaded areas.
- Field of View (FOV): The field of view of an FPV camera influences how much of the environment the pilot can see. A wider FOV can help pilots to quickly assess their surroundings and avoid collisions with branches or other obstacles, making it a vital feature for flying in densely packed canopies.
- Latency: Latency, or the delay between capturing and transmitting the image, can significantly impact the pilot’s control and responsiveness. Low-latency cameras are crucial in fast-paced environments like canopies, as they allow for real-time feedback and more precise maneuvering around obstacles.
- Color Reproduction: A camera that accurately reproduces colors can make it easier for pilots to identify landmarks and navigate through complex environments. Good color reproduction helps distinguish between different types of vegetation and terrain, which is particularly useful in a lush canopy setting.
Why is Low-Light Performance Critical for FPV Cameras Used in Canopy Flying?
Low-light performance is critical for FPV cameras used in canopy flying because these environments often present challenging lighting conditions, including shadows and uneven illumination. The ability of a camera to capture clear, detailed images in low-light situations directly impacts the pilot’s ability to navigate and avoid obstacles.
According to a study published in the Journal of Electronic Imaging, cameras with larger sensors and better low-light sensitivity can significantly enhance image quality in dim conditions, reducing noise and improving detail retention. This is particularly important in canopy flying, where pilots frequently maneuver through dense foliage that can obstruct light and create stark contrasts.
The underlying mechanism involves the camera’s sensor technology, which determines how much light is captured and how it is processed. Cameras equipped with advanced sensor technologies, such as back-illuminated sensors, can gather more light, allowing for better performance in low-light scenarios. This capability is essential for FPV pilots, as the clarity and responsiveness of the camera affect situational awareness and decision-making when navigating through complex environments like forests or jungles.
Furthermore, the frame rate and dynamic range of the camera also play a role in low-light performance. A higher frame rate allows for smoother video playback, which is crucial during rapid maneuvers, while a wider dynamic range can help in balancing bright highlights and dark shadows, ensuring that no critical details are lost. This combination of features is vital for pilots seeking the best FPV camera for canopy flying, as it enables them to maintain control and safety during their flights.
How Does Weight Affect the Stability and Handling of FPV Cameras in Canopy Situations?
The weight of FPV cameras significantly influences their stability and handling, especially in canopy situations where the environment poses unique challenges.
- Camera Weight: Heavier cameras can alter the center of gravity of the drone, potentially leading to instability during flight.
- Mounting Position: The placement of the camera can impact how weight is distributed, affecting maneuverability in tight spaces.
- Wind Resistance: Lightweight cameras tend to perform better in wind, which is crucial when navigating through dense canopies.
- Battery Life: Additional weight from heavier cameras can reduce flight time, complicating longer maneuvers needed in canopy flying.
- Vibration Dampening: Heavier cameras might require better stabilization systems to counteract vibrations that can affect video quality.
Camera weight is crucial because heavier cameras can shift the drone’s center of gravity, making it more challenging to maintain stability. This can lead to issues like increased sensitivity to wind and less responsive handling, particularly in the confined spaces of a canopy.
The mounting position of the camera also plays a vital role in stability. If the camera is mounted too far forward or backward, it can exacerbate balance issues, making it difficult to control the drone effectively when navigating through tight spots in the canopy.
Wind resistance is another factor where lightweight cameras excel. In canopy situations, where the airflow can be turbulent due to surrounding trees, a lighter camera can help maintain a steady flight path and reduce the likelihood of being pushed off course.
Battery life is impacted by the weight of the camera as well. Heavier cameras can drain the battery faster, limiting the time available for capturing footage in the canopy, where extended flight times might be necessary to explore and film.
Finally, vibration dampening becomes critical with heavier cameras. Increased weight can lead to more pronounced vibrations during flight, which can compromise video quality unless effective stabilization mechanisms are in place to mitigate these issues.
What Are the Recommended FPV Cameras for Optimal Canopy Flying?
When selecting the best FPV cameras for optimal canopy flying, consider models that offer superior clarity, durability, and low-light performance. Here are some recommended options:
-
RunCam Eagle 2: Known for its high dynamic range and impressive low-light capabilities, the Eagle 2 delivers vivid color reproduction and minimal motion blur, perfect for navigating treetop canopies.
-
Foxeer Razer Mini: This compact camera features a wide field of view (FOV), making it easier to gauge distances while flying through dense environments. Its durable build ensures it can withstand minor crashes.
-
Caddx Peanut: An ultra-lightweight option with excellent video quality, the Peanut is designed for micro drones. Its image stabilization helps smooth out footage when flying in complex terrains.
-
DJI Camera System: If you are using DJI FPV systems, their cameras provide outstanding image quality and robust transmission, offering clear visuals even in challenging lighting conditions.
-
Horizon Hobby OCULUS: This camera is designed specifically for canopy and indoor flying. It provides sharp resolution and low latency, crucial for maintaining control among obstacles.
Choosing the right camera can enhance your canopy flying experience, allowing for a more immersive and controlled flight.
What Features Make [Specific Model] the Ideal Choice for Canopy Flying?
The best FPV camera for canopy flying should have several key features that enhance performance and usability.
- High Resolution: A high-resolution camera allows for clearer and more detailed images, which are essential when navigating through dense canopies. This feature ensures that pilots can identify obstacles and maneuver accurately in tight spaces.
- Wide Dynamic Range: Cameras with a wide dynamic range can capture more detail in both bright and dark areas, which is crucial when dealing with varying light conditions found in forested environments. This feature helps maintain image quality and visibility during flights in shaded or sunlit areas.
- Lightweight Design: A lightweight camera reduces the overall weight of the drone, which is important for maintaining flight stability and agility when flying through trees. This feature allows pilots to have better control and responsiveness during canopy flying.
- Low Latency: Low-latency video transmission is critical for real-time feedback and control, especially in fast-paced flying scenarios like canopy navigation. This feature ensures that pilots can react quickly to changes in their environment without lag in the video feed.
- Durability: A durable camera can withstand the rigors of outdoor flying, including potential impacts with branches or other obstacles. This feature is vital for longevity and reliability in rugged flying conditions.
- Adjustable FOV (Field of View): An adjustable field of view allows pilots to customize the camera’s perspective according to their flying style and the specific challenges of canopy flying. This flexibility can enhance situational awareness and improve maneuverability.
How Does [Another Specific Model] Enhance the FPV Experience in Dense Forests?
The best FPV cameras for flying in dense forests enhance the flying experience by providing superior visibility and image quality even in challenging environments.
- High Dynamic Range (HDR) Cameras: These cameras can capture a wider range of light, which is essential in dense forests where lighting conditions can vary greatly due to the canopy. HDR cameras help reduce overexposure in bright spots while maintaining detail in darker areas, allowing pilots to see obstacles more clearly.
- Low-Light Performance: Cameras designed for low-light performance excel in situations where lighting is poor, such as beneath the thick canopy of trees. This feature ensures that pilots can still navigate and avoid obstacles even during twilight or cloudy conditions.
- Wide-Angle Lenses: A wide-angle lens allows pilots to capture more of the surrounding area in their field of view, which is particularly useful in densely packed environments. This capability enables better situational awareness, helping pilots to spot branches and other hazards from a distance.
- Lightweight and Compact Design: Cameras that are lightweight and compact are ideal for FPV drones, as they minimize the overall weight and improve flight performance. This is especially important in forest environments where agility and maneuverability are crucial for avoiding obstacles.
- Image Stabilization: Advanced image stabilization technology reduces the effects of vibrations and movements, providing smoother footage during flight. This feature is particularly beneficial when navigating through tight spaces in a forest, as it helps maintain a clear view of the environment.
How Can You Optimize Your FPV Camera Setup for Canopy Conditions?
To optimize your FPV camera setup for canopy conditions, consider the following factors:
- Camera Type: The best FPV camera for canopy conditions typically includes a wide dynamic range (WDR) feature to handle varying light levels.
- Lens FOV: A lens with a wide field of view (FOV) can capture more of the surrounding environment, which is essential in densely wooded areas.
- Low-Light Performance: Selecting a camera that excels in low-light conditions ensures better visibility in shaded areas created by the canopy.
- Mounting Position: The way the camera is mounted can greatly affect its performance; positioning it higher can provide a clearer line of sight through foliage.
- Image Stabilization: Implementing a camera with image stabilization can help reduce the effects of vibrations and jolts while flying through a canopy.
- Color Settings: Adjusting the color settings to enhance greens and browns can improve visibility and make it easier to navigate through tree cover.
The best FPV camera for canopy conditions typically includes a wide dynamic range (WDR) feature to handle varying light levels. This capability helps to balance the bright sunlight filtering through the leaves and the darker areas beneath the canopy, providing clearer images in challenging lighting situations.
A lens with a wide field of view (FOV) can capture more of the surrounding environment, which is essential in densely wooded areas. A greater FOV allows for better situational awareness and helps pilots navigate through tight spaces without losing track of their surroundings.
Selecting a camera that excels in low-light conditions ensures better visibility in shaded areas created by the canopy. Cameras with larger sensors and improved low-light capabilities can pick up more detail in darker environments, making it easier to see obstacles and navigate safely.
The way the camera is mounted can greatly affect its performance; positioning it higher can provide a clearer line of sight through foliage. This can be achieved by using a longer mount or adjusting the camera angle to minimize obstructions from branches and leaves.
Implementing a camera with image stabilization can help reduce the effects of vibrations and jolts while flying through a canopy. This feature smooths out the video feed, making it easier to see and react to sudden changes in the environment.
Adjusting the color settings to enhance greens and browns can improve visibility and make it easier to navigate through tree cover. Tweaking the color profiles can help the camera’s output stand out against the natural backdrop, allowing pilots to identify key features and obstacles more effectively.
What Are the Best Practices for Mounting FPV Cameras in Canopy Settings?
When mounting FPV cameras in canopy settings, there are several best practices to ensure optimal performance and image quality.
- Proper Positioning: Position your FPV camera at an angle that minimizes obstructions from branches and foliage. This helps in capturing a clear view of the surroundings while preventing the camera from being blocked by the canopy.
- Stabilization Techniques: Use a gimbal or vibration dampening mounts to reduce the impact of vibrations from the drone. This is crucial in canopy settings where the drone might encounter turbulence from wind or foliage movement.
- Camera Protection: Equip your FPV camera with a protective housing or lens cover to shield it from scratches and debris. In dense canopies, branches and leaves can easily damage the camera if not properly protected.
- Wide Field of View: Select an FPV camera with a wide field of view (FOV) to capture more of the surroundings. This is particularly useful in dense environments where visibility can be limited by surrounding vegetation.
- Low Light Performance: Choose a camera with good low-light performance, as canopy settings often have varying light conditions due to shadows from trees. Cameras with larger sensors or enhanced low-light capabilities will perform better in these situations.
- Secure Mounting: Ensure that the camera is securely mounted to prevent it from shifting during flight. Use strong adhesives or secure mounting brackets to keep the camera stable, especially in rugged environments.
- Test Flights: Conduct test flights to adjust camera settings and positioning before the actual flight. This allows you to make necessary adjustments based on the initial footage and ensure optimal functionality.
How Can You Fine-Tune Your Camera Settings for Improved Video Quality Under Canopy Coverage?
To improve video quality under canopy coverage, fine-tuning your camera settings is essential.
- Exposure Settings: Adjusting the exposure settings helps manage how light enters the camera. In shaded areas, increasing the exposure can brighten the footage, while reducing it in overly bright conditions can prevent glare and washout.
- White Balance: Setting the correct white balance is crucial for accurate color representation. Under canopy, the green hues can dominate; manually adjusting the white balance helps maintain natural colors, preventing a greenish tint in your videos.
- Frame Rate: Choosing an appropriate frame rate ensures smooth motion capture. A higher frame rate (like 60fps) is ideal for fast-moving shots, while lower rates (30fps) can work well for slower, more stable footage, helping to reduce blurriness under canopy coverage.
- ISO Settings: Adjusting the ISO affects the camera’s sensitivity to light. In low-light conditions under trees, a higher ISO can help capture more detail, but be cautious as it may introduce noise; balancing ISO with other settings is key to optimal quality.
- Shutter Speed: Setting an appropriate shutter speed is important for motion clarity. A rule of thumb is to set your shutter speed to double your frame rate to ensure the motion looks natural, which helps reduce motion blur in fast-moving scenes.
- Lens Choice: Selecting the right lens can significantly impact video quality. A lens with a wider aperture allows more light into the camera, making it easier to capture clear footage in low-light situations typical of canopy environments.
- Field of View (FOV): Adjusting the FOV can enhance your video’s perspective. A wider FOV can capture more of the environment, making it ideal for showcasing the canopy, while a narrower FOV can focus on specific details, enhancing the storytelling aspect of your footage.