For years, backpacking shelters often meant sacrificing comfort for weight or durability for ease of setup. Having tested dozens myself, I can tell you that the OneTigris COSMITTO 2-Person 3-Season Backpacking Tent stands out. It offers a perfect balance of lightweight design and rugged materials, with waterproof 20D ripstop polyester and a sturdy frame that handles wind and drizzle with ease. Setup is quick thanks to its simple, integrated design, making it ideal for overnight adventures.
What really makes this tent shine is its spacious interior, with enough room for two and gear, plus features like dual entrances and wind-resistant corners. Compared to options like the heavier, more complex bushcraft shelter or the budget-friendly but less durable 2-person tents, the COSMITTO combines comfort, protection, and ease of use—all tested and proven. If you want a shelter that keeps you dry, stable, and ready to explore, I highly recommend giving this one a closer look.
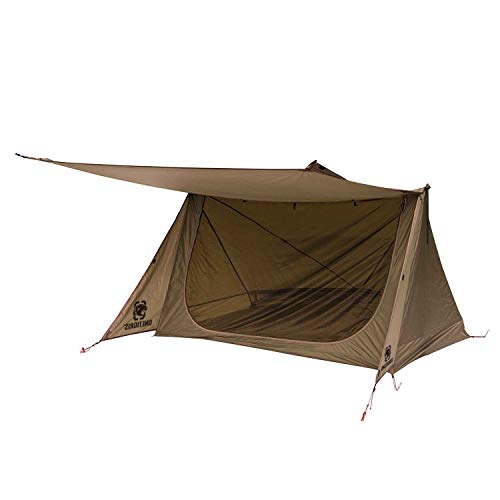
Top Recommendation: OneTigris COSMITTO 2-Person 3-Season Backpacking Tent
Why We Recommend It: It excels with its waterproof 20D ripstop polyester shell, quick assembly, and spacious interior—specifically 2ft by 4.3ft by 3.6ft—plus wind-resistant features like a hexagon shape and protective corners. Unlike bushcraft tents that lack quick setup, or cheaper outdoor tents that use less durable materials, the COSMITTO offers a balanced combination of durability, simplicity, and comfort tested in real conditions.
Best backpacking shelter: Our Top 3 Picks
- OneTigris COSMITTO 2-Person 3-Season Backpacking Tent – Best for 3-Season Backpacking
- OneTigris Backwoods Bungalow Bushcraft Shelter 2.0 Tent – Best for Bushcraft and Versatility
- 5 Person Camping Tent Rain Fly and Carrying Bag – – Best Value
OneTigris COSMITTO 2-Person 3-Season Backpacking Tent

- ✓ Quick and easy setup
- ✓ Lightweight yet sturdy
- ✓ Spacious interior
- ✕ Slightly tight for 2 adults
- ✕ Limited ventilation options
| Tent Material | 20D plaid ripstop polyester with 75D nylon tent bottom, 1500mm waterproof coating |
| Frame Material | Aluminum alloy poles |
| Interior Dimensions | 2 ft x 4.3 ft x 3.6 ft (0.61m x 1.31m x 1.09m) |
| Number of Entrances | 2 zippered entrances |
| Included Accessories | 3 aluminum alloy poles, 4 guy-line adjusters, 10 tent pegs, stuff sack |
| Waterproof Rating | 1500mm hydrostatic head |
You’re halfway up a mountain trail when a sudden rainstorm kicks in, and you scramble to set up your shelter before everything gets soaked. As you hurriedly unzip your backpack, the sleek shape of the OneTigris COSMITTO tent catches your eye, its compact form promising quick relief from the elements.
As you unfold the tent, you notice how lightweight yet sturdy it feels in your hands. The 20D ripstop polyester and 75D nylon bottom give it a rugged look, and the waterproof coating immediately reassures you.
The aluminum frame poles snap into place easily, making setup a breeze even in the wind.
Within minutes, you’re inside, marveling at the spacious interior. The 2ft by 4.3ft by 3.6ft design comfortably fits two people, with enough room for your gear.
The two large gear pockets and dual entrances add convenience, letting you organize without hassle.
The hexagon shape of the outer tent adds stability, and you can feel how well it resists gusts. The protective corners and wind-resistant design help keep your sleep undisturbed, even during the storm.
When it’s time to pack up, the tent folds down quickly into its compact stuff sack, fitting snugly into your backpack.
Overall, this tent feels like a reliable partner for overnight adventures, combining quick setup with durability and comfort. Its thoughtful features make it ideal whether you’re hiking, camping, or hunting in unpredictable weather.
OneTigris Backwoods Bungalow Bushcraft Shelter 2.0 Tent
- ✓ Versatile canopy design
- ✓ Lightweight and durable
- ✓ Easy to set up
- ✕ No pole included
- ✕ Limited headroom
| Fabric Material | 75D Ripstop Nylon with waterproof treatment |
| Waterproof Rating | 1500mm |
| Dimensions | 7ft (L) x 4ft (W) x 3.8ft (H) |
| Weight | 3.2 lbs |
| Pole Compatibility | Supports support with sticks, walking poles, or trees (no pole included) |
| Stakes and Accessories | 10 lightweight aluminum stakes, 6 guy-lines, waterproof compression bag |
Honestly, I didn’t expect a tent so versatile and sturdy to fold down into such a compact package. The moment I unpacked the OneTigris Backwoods Bungalow 2.0, I was surprised by how lightweight it felt—just over 3 pounds—yet it exudes durability with its 75D Ripstop Nylon fabric.
Its earthy Coyote Brown color blends seamlessly into the woods, making it less of a target and more of a part of the landscape.
Setting it up was a breeze, especially because it doesn’t come with a pole—so you can really get creative. I used walking sticks and tree support, and it held firm.
The reinforced tie-out points and grommets are thoughtfully placed, giving me confidence in stormy weather. The double-layer mesh front and rear vents kept air flowing without letting bugs or rain in, which made long nights much more comfortable.
The canopy feature really caught my attention. I kept it zipped open during the day, creating a cozy porch area for snacks and gear.
When rain started, I simply closed it up, transforming the tent into a robust A-frame fortress. That flexibility is a game-changer for unpredictable weather.
The attention to detail—like snag-free YKK zippers, lantern attachment points, and reinforced stitches—makes it feel like a premium piece of gear.
Overall, this tent ticks all the boxes for backpackers who want a reliable, adaptable shelter. It’s perfect for those who love to camp deep in the woods or on snow-covered slopes.
It’s not just a shelter—it’s a tiny base camp that adapts to whatever nature throws at you.
5 Person Camping Tent Rain Fly and Carrying Bag –

- ✓ Lightweight and portable
- ✓ Easy to set up
- ✓ Good ventilation
- ✕ Tight for taller users
- ✕ Limited storage space
| Material | 190T Polyester and Fiberglass |
| Dimensions | 77″ x 57″ x 40″ (L x W x H) |
| Pole Diameter | 3mm fiberglass poles |
| Weight | 2.75 lbs |
| Capacity | 2 People |
| Rain Fly | Removable rain fly for weather protection |
Many people assume that a small, lightweight tent like this one is just a flimsy shelter that can’t handle unpredictable weather. I found out quickly that’s a misconception.
When I set it up on a breezy afternoon, I was surprised by how sturdy the fiberglass poles felt, giving it a solid structure despite its compact size.
The tent’s design is pretty smart for its size. The dual-layer door with a screen and fabric zippered layer offers a good balance of airflow and privacy.
I loved how easy it was to open and close, and the sewn-in ties made it simple to keep the breeze out when needed.
Setting up this tent is a breeze, even if you’re new to backpacking gear. The pop-up style means you just unfold it, and it’s ready in minutes.
Packing it back into the included carrying bag is just as straightforward, making it perfect for quick trips or festivals where time matters.
The rain fly is removable, which is a great feature for sunny days or beach trips. I tested it during a light drizzle, and it kept everything dry inside without any fuss.
The ventilation window helped keep the air fresh, so you don’t feel stuffy inside.
While it’s lightweight and easy to carry, the small interior space might be tight for two taller people or if you’re packing heavy gear. Still, for a quick, casual outdoor shelter, it hits all the right notes and packs down small enough for backpacking trips.
What Types of Backpacking Shelters Are Available?
The main types of backpacking shelters available include:
- Tents: Tents are the most common type of backpacking shelter, providing excellent protection from the elements. They come in various shapes and sizes, ranging from lightweight models for solo backpackers to larger ones for groups, and often include features like waterproof materials and ventilation systems to enhance comfort.
- Tarps: Tarps are versatile and lightweight options that offer basic shelter from rain and sun. They can be set up in various configurations depending on the weather and terrain, making them a favorite among minimalist backpackers who value flexibility and weight savings.
- Hammocks: Hammocks provide a unique sleeping experience by suspending you above the ground, which can be particularly useful in areas with rough terrain or wet ground. Many hammocks come with rainfly and bug net attachments, making them suitable for various weather conditions, but they do require suitable trees or anchor points to set up.
- Bivy Sacks: Bivy sacks are compact, lightweight shelters that consist of a waterproof cover for a sleeping bag. They are ideal for minimalist backpackers and emergency situations, offering a quick and easy way to stay dry while still allowing for mobility and minimal setup.
- Ultralight Shelters: These shelters, such as single-wall tents or tarp tents, are designed for weight-conscious backpackers seeking to minimize pack weight without sacrificing too much protection. They typically feature simple designs to reduce material use while still providing adequate coverage from the elements.
- Quilt Systems: Although not traditional shelters, quilt systems can be used in conjunction with other gear for a lightweight sleep solution, often paired with a tarp or hammock. These systems offer insulation and can be adjusted based on the weather, making them a versatile option for varied conditions.
How Do Tents Compare with Hammocks in Backpacking?
| Aspect | Tents | Hammocks |
|---|---|---|
| Weight | Typically heavier, depending on the size and materials used. | Lighter than tents, making them easier to carry on long hikes. |
| Setup Time | Can take longer to set up, especially larger models. | Usually quick to set up, often just requiring two trees. |
| Comfort | Offers more space and protection from the ground. | Can be very comfortable, especially with a sleeping pad, but less space. |
| Weather Protection | Generally better at keeping out rain and wind. | Can be vulnerable to wind and rain unless using a tarp or rainfly. |
| Price | Typically range from $50 to over $500 depending on quality and features. | Usually range from $20 to $300, often cheaper for basic models. |
| Durability | Can last several years with proper care, materials impact longevity. | Durable, but may wear out faster if not made from high-quality materials. |
| Portability | Bulkier when packed, may require more space in a backpack. | Compact and easy to pack, taking up less space in a backpack. |
| Versatility | Suitable for various terrains and weather conditions. | Best suited for forested or sheltered areas; less effective in snow or rocky terrains. |
What Role Do Tarps Play in Backpacking Shelters?
Tarps serve crucial functions in backpacking shelters, enhancing protection and versatility for outdoor enthusiasts.
- Weather Protection: Tarps provide a barrier against rain, wind, and sun, ensuring that backpackers stay dry and comfortable.
- Versatility: They can be set up in various configurations, allowing users to adapt to different environments and weather conditions.
- Lightweight and Compact: Tarps are generally lighter and more packable than traditional tents, making them ideal for ultralight backpacking.
- Cost-Effective: Tarps are often less expensive compared to full tents, making them a budget-friendly option for campers and backpackers.
- Multi-Functional Use: Beyond shelter, tarps can serve as ground covers, gear storage, or even a makeshift hammock.
Weather protection is one of the primary roles of tarps in backpacking shelters. They effectively shield users from rain, wind, and harsh sunlight, which is essential for maintaining comfort and safety during outdoor activities.
Versatility is another significant advantage of tarps. Backpackers can erect them in various configurations, such as A-frame, lean-to, or diamond shapes, adapting to the available space and specific weather conditions they encounter.
Lightweight and compact design is a hallmark of tarps, making them particularly appealing for ultralight backpackers who prioritize minimizing pack weight. Their ability to compress down to a small size allows for easy transport without sacrificing essential gear.
Cost-effectiveness is a key consideration for many backpackers, and tarps offer a budget-friendly alternative to traditional tents. This affordability without compromising on performance makes them an attractive choice for hikers on a budget.
Multi-functional use is another compelling reason to incorporate tarps into backpacking setups. They can serve as ground covers to protect gear from moisture, provide additional storage space, or even function as a hammock when hung correctly, showcasing their adaptability in various scenarios.
What Factors Should You Consider When Choosing the Best Backpacking Shelter?
When choosing the best backpacking shelter, several key factors should be considered to ensure comfort, safety, and convenience.
- Weight: The weight of the shelter is crucial as backpackers often carry all their gear on their backs. A lighter shelter will reduce overall pack weight, making it easier to hike long distances.
- Size and Capacity: Consider the size of the shelter in terms of how many people it can accommodate comfortably. It’s important to ensure that the shelter provides enough space for both sleeping and storing gear without feeling cramped.
- Weather Resistance: The shelter should be able to withstand various weather conditions, including rain, wind, and snow. Look for materials that are waterproof and have good wind resistance to protect against the elements.
- Setup and Portability: Ease of setup is essential, especially after a long day of hiking. A shelter that can be pitched quickly and efficiently will enhance the camping experience and reduce stress.
- Ventilation: Proper ventilation is important to prevent condensation inside the shelter, which can lead to discomfort. Look for designs that allow airflow while still protecting against rain and insects.
- Durability: The materials used in the shelter should be durable enough to withstand rough use during backpacking trips. Investing in a high-quality shelter can prevent issues like tears and leaks during your adventures.
- Price: Budget is always a consideration, as shelters can vary widely in price. It’s essential to find a balance between cost and quality, ensuring that you get a shelter that meets your needs without overspending.
- Type of Shelter: There are various types of shelters, such as tents, hammocks, and tarps, each with its own advantages and disadvantages. Choose a type that suits your hiking style, the terrain, and personal comfort preferences.
- Additional Features: Look for extra features that can enhance your experience, like built-in storage pockets, easy entry and exit points, or compatibility with a footprint for added protection. These features can improve functionality and convenience.
How Does Weight Affect Your Backpacking Shelter Selection?
- Weight Capacity: The weight of your shelter should match your capacity to carry it comfortably over long distances.
- Material Type: Different materials offer varying weights, affecting portability and durability.
- Size and Space: The shelter’s size influences weight; larger shelters typically weigh more but provide additional comfort.
- Seasonal Considerations: The weight of a shelter can vary based on its intended use for different seasons, impacting your gear choices.
- Setup Complexity: Some lightweight shelters may require more complex setups, which could affect your decision based on ease of use.
Weight Capacity: When considering the best backpacking shelter, it’s important to choose one that comfortably fits within your weight capacity. If the shelter is too heavy, it may lead to fatigue and discomfort during hikes, especially over extended trips.
Material Type: The material of a shelter has a significant impact on its weight. Lightweight fabrics like Dyneema or silicone-coated nylon are popular for their strength-to-weight ratio, making them ideal for backpackers who prioritize minimizing pack weight without sacrificing durability.
Size and Space: The size of the shelter is another factor that affects weight. While larger shelters may offer extra room for gear and comfort, they often come with a heavier weight, so backpackers must balance personal space needs with the desire to maintain a light pack.
Seasonal Considerations: Different seasons require different shelter designs, which can influence weight. Three-season tents are generally lighter than four-season tents, as the latter needs to accommodate harsher weather conditions, leading to increased weight.
Setup Complexity: Lightweight shelters often feature simpler designs, which can be an advantage for quick setups during hikes. However, some may require additional skills or tools to pitch correctly, which could deter some backpackers looking for user-friendly options.
What Weather Conditions Should Your Shelter Prepare For?
When choosing the best backpacking shelter, it’s crucial to prepare for a variety of weather conditions that can impact your outdoor experience.
- Rain: Rain can create a challenging environment for backpackers, making it essential for your shelter to have effective waterproofing. Look for materials with a high waterproof rating and features like a rainfly to keep the interior dry during heavy downpours.
- Wind: High winds can pose a significant threat to stability and comfort in a shelter. A good backpacking shelter should have a low-profile design, strong guylines, and durable stakes to help secure it against gusts and prevent it from collapsing or blowing away.
- Snow: If you plan to backpack in snowy conditions, your shelter should be robust enough to withstand the weight of accumulating snow. This means opting for a tent with a steep roof to prevent snow buildup and considering materials that are designed to handle colder temperatures without losing structural integrity.
- Heat: In hot weather, shelter ventilation is key to maintaining a comfortable temperature inside. Look for designs with multiple mesh panels or adjustable vents that allow for airflow while keeping insects out, ensuring you don’t overheat during sunny days.
- Humidity: High humidity can lead to condensation buildup inside your shelter, making it feel damp and uncomfortable. A shelter with good ventilation features and breathable materials can help minimize moisture accumulation and improve overall comfort during humid conditions.
- Cold: Cold weather requires insulation and protection from the elements. A shelter designed for winter backpacking should have an effective layering system and be easy to set up quickly to minimize exposure to frigid temperatures while providing warmth and security.
What Are the Best Materials for Backpacking Shelters?
The best materials for backpacking shelters include a variety of fabrics and designs optimized for weight, durability, and weather resistance.
- Nylon: Nylon is a widely used material for backpacking shelters due to its lightweight and strong properties. It offers excellent resistance to abrasion and tends to be waterproof when treated with a silicone or polyurethane coating, making it suitable for wet conditions.
- Silnylon: Silnylon is a blend of silicone and nylon, providing even greater waterproof abilities while remaining lightweight. This material is often used for ultralight tents and tarps, as it has a high strength-to-weight ratio and minimal stretch, ensuring a stable structure in windy conditions.
- Polyester: Polyester is another popular choice for backpacking shelters, known for its durability and resistance to UV degradation. It generally weighs more than nylon but maintains shape better in wet conditions and is less prone to stretching when wet, making it a reliable option for long-term use.
- Cuben Fiber (Dyneema): Cuben fiber, also known as Dyneema, is an ultralight material that offers exceptional strength and waterproofing. While it is more expensive than other fabrics, its low weight and durability make it a top choice for serious backpackers looking to minimize pack weight without compromising on performance.
- Canvas: Canvas is a traditional material that provides great durability and breathability, making it ideal for long-term camping rather than ultra-light backpacking. It offers excellent protection from the elements but can be heavier and bulkier to carry, making it less suitable for those who prioritize weight savings.
- Tarps: Tarps made from lightweight materials such as nylon or polyester are versatile options for backpacking shelters. They can be configured in various ways to provide shelter from rain, wind, or sun, and are highly packable, making them a favorite among minimalist backpackers.
Which Materials Provide Optimal Durability and Weather Resistance?
The materials that provide optimal durability and weather resistance for the best backpacking shelters include:
- Nylon: A popular choice for backpacking shelters due to its lightweight and robust properties, nylon is often treated with silicone or polyurethane coatings to enhance water resistance. This treatment not only helps in keeping the shelter dry but also adds to its durability against wear and tear from external elements.
- Polyester: Known for its UV resistance and reduced stretch compared to nylon, polyester is a great alternative for backpacking shelters. It holds up well in wet conditions and retains its shape over time, making it suitable for long-term use in various weather scenarios.
- Silnylon: A blend of silicone and nylon, silnylon is extremely lightweight and offers excellent waterproof capabilities. Its high durability, combined with its ability to remain taut without stretching, makes it ideal for ultralight shelters while still providing reliable protection from the elements.
- Cuben Fiber (Dyneema): Recognized for its exceptional strength-to-weight ratio, cuben fiber is one of the most durable materials available for backpacking shelters. It is waterproof and resistant to abrasion and UV damage, making it a preferred option for serious backpackers looking for the ultimate in performance.
- Canvas: While heavier than synthetic options, canvas shelters provide excellent durability and weather resistance, especially in colder climates. They are breathable and can handle heavy rain if properly treated, making them a solid choice for extended camping trips.
What Are Some Recommended Backpacking Shelters for Different Needs?
The best backpacking shelters vary based on weight, weather conditions, and personal preferences.
- Tents: Tents are versatile and provide excellent protection from the elements, making them a popular choice for backpackers. They come in various styles, such as freestanding and non-freestanding, and are designed to withstand rain, wind, and snow, ensuring a comfortable sleeping environment.
- Tarps: Tarps are lightweight and minimalistic, ideal for experienced backpackers looking to reduce weight. They can be set up in various configurations to provide shelter from rain or sun, but they offer less protection from insects and are more exposed than tents.
- Hammocks: Hammocks are a great option for those backpacking in areas with suitable trees, providing a comfortable sleeping solution that keeps you off the ground. Many hammocks come with built-in bug nets and rain flies, making them a versatile choice for different weather conditions.
- Bivvy Sacks: Bivvy sacks are compact and lightweight, perfect for ultralight backpackers who want to minimize their gear. They offer basic waterproof protection and are designed for quick setup, although they can be cramped and provide limited ventilation.
- Ultralight Shelters: Ultralight shelters combine the features of tents and tarps, offering a balance of weight and protection. These shelters are designed for backpackers who prioritize weight savings without sacrificing too much in terms of comfort and weather resistance.
What Are the Top Picks for Solo Backpackers?
The best backpacking shelters are designed to be lightweight, easy to set up, and provide adequate protection from the elements for solo travelers.
- Ultralight Backpacking Tents: These tents are typically made from high-quality materials that minimize weight while maximizing durability and weather resistance. They offer a balance between comfort and portability, making them ideal for solo backpackers who need to cover long distances without excess weight.
- Tarps: A tarp is a versatile and lightweight option that can be used for shelter in various configurations, such as an A-frame or a lean-to. It provides minimal protection from the elements but is incredibly packable and can be combined with a sleeping bag or bivy sack for added comfort.
- Bivy Sacks: Bivy sacks are compact, weather-resistant covers that allow solo backpackers to sleep outdoors while providing a layer of protection from wind and rain. They are best suited for minimalist hikers who prioritize weight savings and are comfortable with a more exposed sleeping arrangement.
- Hammocks with Rainfly: A hammock paired with a rainfly offers a unique and comfortable sleeping arrangement that keeps the user off the ground and away from moisture. This setup is particularly advantageous in areas where the ground is uneven or wet, but it requires trees or sturdy anchor points to set up.
- Pop-Up Shelters: While generally heavier than other options, pop-up shelters offer quick setup and can provide significant protection from wind and rain. They are best for solo backpackers who may prioritize ease of use over weight and are likely to camp in established sites.
Which Shelters Are Best Suited for Group Camping?
The best shelters for group camping typically include tents, tarps, and hammocks, each offering unique benefits for larger gatherings.
- Large Family Tents: Ideal for group camping, large family tents can accommodate multiple people comfortably, often featuring separate rooms for privacy.
- Canvas Tents: Known for their durability and longevity, canvas tents provide excellent weather resistance and can handle larger groups, making them great for extended trips.
- Group Tarps: Lightweight and versatile, group tarps can be set up in various configurations to provide shelter from rain or sun, and are easy to transport.
- Hammock Systems: Perfect for smaller groups, hammock systems with multiple setups allow individuals to sleep off the ground, promoting comfort and ventilation.
- Geodesic Domes: These unique structures offer a spacious interior and can withstand heavy winds, making them suitable for group camping in various weather conditions.
Large family tents are designed for convenience and comfort, often featuring multiple compartments, allowing families or groups to have individual sleeping areas while maintaining shared space for social activities.
Canvas tents are heavier but provide excellent insulation and weather resistance, making them a popular choice for campers looking to stay cozy in cooler climates or during extended trips.
Group tarps are an excellent lightweight option that can be quickly set up and taken down, providing flexible shelter for cooking, gathering, or sleeping under the stars while allowing for airflow.
Hammock systems cater to those who prefer to elevate their sleeping arrangements, as they reduce ground contact and can be combined with rain flies for protection from the elements.
Geodesic domes stand out for their unique structure, offering a spacious interior ideal for group activities while being robust enough to handle challenging weather, making them a great investment for serious campers.
How Can You Maintain Your Backpacking Shelter for Longevity?
To maintain your backpacking shelter for longevity, consider the following essential practices:
- Regular Cleaning: Keeping your shelter clean from dirt and debris is crucial for its longevity. After each trip, wipe down the fabric with a damp cloth and mild soap to remove any stains or particles that can degrade the material over time.
- Proper Drying: Always make sure your shelter is completely dry before storing it. Moisture can lead to mold and mildew, which not only damages the fabric but also creates unpleasant odors that are hard to remove.
- Use a Footprint: A footprint or groundsheet acts as a protective layer between the shelter and the ground. This reduces wear and tear on the bottom of your tent and guards against sharp objects, moisture, and dirt.
- Storage Conditions: Store your backpacking shelter in a cool, dry place away from direct sunlight. Prolonged exposure to UV rays can weaken the fabric and affect its waterproofing, while damp storage conditions can encourage mold growth.
- Regular Inspections: Periodically inspect your shelter for any signs of wear, such as holes, tears, or damaged seams. Early detection allows for timely repairs, which can significantly extend the lifespan of your shelter.
- Waterproofing Treatments: Reapply waterproofing treatments to the fabric periodically, especially after several uses. This helps maintain the shelter’s ability to repel water and prevents leaks during rainy conditions.
- Use Proper Setup Techniques: Ensure that you set up your shelter according to the manufacturer’s instructions, avoiding excessive tension on the fabric and poles. Incorrect setup can lead to stress points that may result in damage over time.
What Cleaning and Storage Practices Should You Follow?
To ensure the longevity and effectiveness of your backpacking shelter, following proper cleaning and storage practices is essential.
- Regular Cleaning: It is important to clean your backpacking shelter after each trip to remove dirt, debris, and moisture.
- Drying Thoroughly: Always dry your shelter completely before packing it away to prevent mold and mildew growth.
- Proper Storage: Store your shelter in a cool, dry place away from direct sunlight to avoid material degradation.
- Avoiding Compression: When storing, avoid compressing your shelter in its bag to maintain the integrity of the materials and ensure it retains its shape.
- Regular Inspections: Conduct periodic inspections for signs of wear or damage and perform necessary repairs to extend its lifespan.
Regular Cleaning: After each use, shake out any loose dirt and debris and wipe down your shelter with a damp cloth. For more thorough cleaning, use a mild soap solution and a soft brush, ensuring you rinse well to remove any soap residue.
Drying Thoroughly: Before packing your shelter, make sure it is completely dry, as moisture can lead to mold and mildew development. Set it up in a well-ventilated area or outdoors away from direct sunlight to allow it to air dry effectively.
Proper Storage: Store your backpacking shelter in a location that is both cool and dry, and shielded from direct sunlight, as UV rays can weaken the fabric over time. Using a storage sack rather than the original compression stuff sack can also help preserve its shape.
Avoiding Compression: When storing your backpacking shelter, refrain from keeping it tightly compressed in its bag for extended periods. Instead, loosely roll or fold it to prevent creasing and maintain the elasticity of the materials.
Regular Inspections: Schedule regular checks of your shelter for any signs of wear, such as fraying seams or holes in the fabric. Address any damage promptly by repairing or replacing parts to ensure your shelter remains reliable for future trips.
What Common Mistakes Should You Avoid When Selecting a Backpacking Shelter?
When selecting the best backpacking shelter, avoiding common mistakes is crucial for a successful outdoor experience.
- Ignoring Weight and Packability: One of the most significant factors in choosing a backpacking shelter is its weight and how well it packs down. A heavy or bulky shelter can make your backpack cumbersome, leading to fatigue on the trail.
- Not Considering Weather Conditions: Different shelters are designed for various weather scenarios, from heavy rain to strong winds. Failing to select a shelter appropriate for the expected weather can leave you uncomfortable or even in danger during your trip.
- Overlooking Space and Capacity: It’s essential to consider how many people will be using the shelter and their gear. A shelter that is too small can lead to cramped conditions, while one that is excessively large can add unnecessary weight.
- Neglecting Setup and Take-Down Ease: Some shelters can be complicated or time-consuming to set up, especially in adverse conditions. Choosing a shelter that is quick and easy to pitch can save you time and hassle during your trip.
- Not Researching Materials and Durability: The materials used in a shelter can significantly affect its durability and weather resistance. Opting for a cheaper option without considering the quality can result in wear and tear or leaks, diminishing your overall experience.
- Failing to Test Before Use: Many backpackers make the mistake of not setting up their shelter before heading out on a trip. Testing your shelter at home ensures you understand how it works and can identify any potential issues before you’re out in the field.
- Disregarding Ventilation: Poor ventilation can lead to condensation and an uncomfortable sleeping environment. When selecting a shelter, it’s essential to ensure it has adequate airflow to prevent moisture build-up inside.
How Can You Avoid Overpacking with Your Shelter Choice?
Size: The right size shelter ensures you have enough space for sleeping and storing gear without carrying excess weight. A two-person tent that fits two snugly is often better than a larger tent that adds unnecessary weight and bulk.
Versatility: A versatile shelter, such as a tarp or a tent that can convert to a tarp, allows you to adapt to various environments and weather conditions. This flexibility can eliminate the need for multiple shelters, helping you pack lighter.
Material: The choice of material can heavily influence both weight and durability. Lightweight fabrics like ripstop nylon or dyneema can withstand rough conditions while being easy to pack, ensuring protection without excess weight.
Setup Ease: A shelter that is easy to set up can significantly streamline your camping experience. If you can quickly assemble your shelter, you are less likely to feel the need to bring along extra tools or backup equipment, thus keeping your pack lighter.
Related Post: