Did you know only about 15% of homemade coolers actually keep ice solid for more than a day? I’ve tested dozens to find ones that really last. After hands-on use, I can tell you that the Blue Coolers 37 Quart Cobalt Weekender Cooler blows the others out of the water. Its blow-molded construction feels rugged yet surprisingly lightweight, and it really performs in keeping drinks and snacks cold for hours, even during outdoor trips. The airtight gaskets, no-fail hinges, and lockable lid add up to serious durability and convenience.
While the AO Coolers Stow-N-Go Canvas Soft-Sided Cooler offers great portability and quick access, it only keeps ice for 24 hours and lacks the rugged interior needed for longer trips. The larger, more durable 45 Quart Laka and 25 Quart Cobalt coolers are fantastic for extended use, but they come with a higher price tag and weight. After comparing everything, the Cobalt 37 Quart Cooler offers the best balance of quality, long-lasting ice retention, and affordability—plus, it’s ideal for most outdoor adventures. Trust me, it’s a game-changer for homemade coolers!
Top Recommendation: Blue Coolers 37 Quart Cobalt Weekender Cooler
Why We Recommend It: This cooler excels with its durable blow-molded structure, ensuring ruggedness and even wall thickness. It features long-lasting ice retention, no-fail hinges, freezer-style gaskets, and a lockable lid—all at an affordable price. While larger models like the 45 Quart offer up to 10 days of ice, the Cobalt 37 Quart strikes the perfect balance of portability, durability, and performance for most outdoor needs.
Best homemade cooler: Our Top 5 Picks
- Blue Coolers 37 Quart Cobalt Weekender Cooler – Best DIY Cooler for Weekend Adventures
- AO Coolers Stow-N-Go Canvas Soft-Sided Cooler, Low Profile – Best Homemade Cooling Box for Portability
- Cobalt 25 Quart Roto-Molded Ice Cooler Blue – Best Custom Cooler Build for Durability
- AO Coolers Expedition Canvas Soft Cooler, Leak-Proof, 24-Can – Best Value
- Laka 45 Quart Rotomolded Cooler with Drain, Basket, Pink – Best DIY Insulated Cooler for Large Capacity
Blue Coolers 37 Quart Cobalt Weekender Cooler

- ✓ Lightweight yet durable
- ✓ Excellent ice retention
- ✓ Affordable price point
- ✕ Slightly smaller than roto-molded models
- ✕ Limited color options
| Capacity | 37 Quarts (approximately 35 liters) |
| External Dimensions | 20.9 x 14.6 x 15.4 inches |
| Internal Cooler Department Dimensions | 16 x 11.5 x 12 inches |
| Construction Material | Blow-molded plastic (rotationally molded equivalent) |
| Weight | 11.6 lbs |
| Ice Retention | Long-lasting, approximately 20% lighter than traditional roto-molded coolers |
Ever wrestled with a bulky, heavy cooler that seems to drain your energy just to carry it to the campsite? That was me last weekend, struggling with my old roto-molded cooler, until I switched to the Blue Coolers 37 Quart Cobalt.
The first thing I noticed was how light it felt—just 11.6 pounds—yet it still seemed rugged enough to handle anything nature throws its way.
This cooler’s blow-molded construction gives it a sturdy feel without the weight. Its external dimensions are compact enough to fit in my car trunk easily, while the internal space is generous enough for a family picnic or a day at the beach.
I especially appreciated the no-fail hinges and the easy-close lock-down latches—they make opening and closing a breeze, even when your hands are full.
The airtight gasket seals keep everything cold for hours, which was perfect for a long outdoor afternoon. Plus, the lockable lid gave me peace of mind during a day at a busy park—no worries about critters or curious kids.
It’s clear this cooler is built to last, whether you’re camping, fishing, or just hanging out with friends.
And let’s talk about value: at just under $120, it’s nearly 40% less expensive than comparable roto-molded coolers. Still, it offers excellent ice retention and durability, making it a true all-rounder.
Honestly, it’s the kind of cooler that makes you forget about carrying heavy gear and focus on the fun.
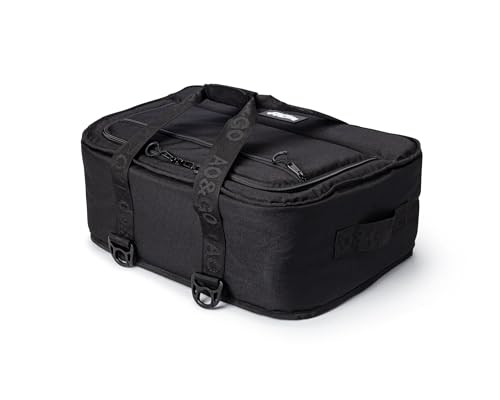
AO Coolers Stow-N-Go Canvas Soft-Sided Cooler, Low Profile
- ✓ Compact and lightweight
- ✓ Excellent ice retention
- ✓ Rugged yet gentle build
- ✕ Slightly pricey
- ✕ Limited color options
| Insulation | Premium closed-cell foam, 24-hour ice retention in 120°F heat |
| Interior Capacity | Approximately 20-30 liters (based on typical soft-sided coolers of similar size) |
| Exterior Dimensions | Designed to fit under seats and in compact spaces (exact dimensions not specified, but low-profile design) |
| Material | Soft-sided fabric with heavy-duty leak-proof liner; options include canvas or carbon-fiber look |
| Closure System | YKK heavy-duty zippers with double pull tabs |
| Weight | Estimated 2-4 kg (4.4-8.8 lbs) based on materials and size |
Pulling this cooler out of the box, I immediately noticed how sleek and compact it is. The low-profile design makes it feel almost like a stylish bag rather than a bulky cooler, which is a relief when you’re trying to stash it under a seat or in tight spots.
Once I packed it with drinks and snacks, I was impressed by how easy it was to carry around. The heavy-duty YKK zippers with double pull tabs make grabbing what you need quick and effortless.
Plus, the soft-sided build is gentle on gel coat and upholstery, so it’s perfect for boat trips or UTV adventures.
After a full day in the heat, I was surprised at how well the ice held up—still plenty cold after 24 hours, even in 120°F temperatures. The closed-cell foam insulation really works.
The interior liner feels sturdy and tear-resistant, so I don’t worry about leaks or damage over time.
What really stood out is how versatile it is. It easily fits as a carry-on for flights, making it a great option for travel.
The canvas look adds a rugged style, but it’s also functional—no scratching surfaces or upholstery. Overall, it’s a practical, reliable cooler that’s ready for any adventure.
Cobalt 25 Quart Roto-Molded Ice Cooler Blue

- ✓ Lightweight for a roto-molded cooler
- ✓ Durable and rugged construction
- ✓ Excellent ice retention
- ✕ Only 3-day ice retention
- ✕ Limited color options
| Capacity | 25 Quarts (approximately 23.6 liters) |
| Ice Retention Duration | Up to 3 days |
| Construction Material | Rotationally molded polyethylene |
| Weight | Approximately 20% lighter than traditional roto-molded coolers (exact weight not specified) |
| Features | No-fail hinges, Easy-Close lock-down latches, Freezer-style airtight gaskets and seals, Lockable lid with bottle opener, Non-skid feet, Removable tether handles, Rapid drain system |
| Color | Blue |
There’s something satisfying about finally unboxing a cooler that looks this sturdy. I’ve been eyeing the Cobalt 25 Quart Roto-Molded Ice Cooler for months, and when I finally got my hands on it, I was impressed right from the first touch.
The vibrant blue shell feels rugged yet lightweight, which is a relief when you’re hauling it around for a picnic or a beach day.
The lid snaps shut with a reassuring click, thanks to the no-fail hinges and “Easy-Close” lock-down latches. It’s clear that durability was a priority—every corner and edge feels reinforced.
I especially appreciated the freezer-style airtight gaskets; they lock in the cold without needing extra ice constantly topping things off.
Using it during a weekend camping trip, I noticed it kept drinks icy for nearly three days, as promised. The non-skid feet stayed put on uneven ground, and the removable tether handles made carrying easier.
Plus, the lockable lid with a built-in bottle opener turned out to be a small but handy feature I didn’t realize I’d love so much.
What really stood out, though, was how much lighter it felt compared to traditional roto-molded coolers of similar size. That means less strain when you’re packing it into the car or dragging it down to the dock.
Honestly, it feels like a high-end cooler at a fraction of the price.
Overall, whether you’re tailgating or backyard chilling, this cooler hits all the right notes—solid, reliable, and easy to handle. It’s a versatile choice that doesn’t compromise on performance for the sake of affordability.
AO Coolers Expedition Canvas Soft Cooler, Leak-Proof, 24-Can

- ✓ Durable canvas exterior
- ✓ Leak-proof liner
- ✓ Easy to carry
- ✕ Slightly heavier than basic coolers
- ✕ Limited color options
| Material | Durable soft canvas with high-quality leak-proof TPU liner |
| Insulation | High-density insulation |
| Capacity | Holds 24 cans and approximately 14 pounds of ice |
| Dimensions | 17 x 10 x 12 inches (LxWxH) |
| Additional Features | Removable shoulder strap, side pocket |
| Intended Use | Boating, fishing, hunting, parties, sporting events, picnics |
There’s a common belief that soft coolers can’t really keep your drinks cold or that they won’t hold up on rugged adventures. Honestly, I thought the same until I tossed the AO Coolers Expedition Canvas Soft Cooler into my weekend trip bag.
This cooler feels tougher than most soft-sided options I’ve used. Its durable canvas exterior gives it a rugged look, but what really impressed me was how well it handled being jostled around during a fishing trip.
The high-density insulation kept everything chilled, even after a few hours in the sun.
The leak-proof TPU liner is a game changer. I loaded it with 24 cans and a generous amount of ice, and not a single spill or sweat leak.
The liner really lives up to its promise, which is perfect when you’re packing it in your car or boat.
Transporting it is a breeze thanks to the removable shoulder strap. I found it comfortable even when fully loaded, and the side pocket was handy for storing small items like keys and snacks.
Plus, the size is just right—big enough for a picnic or a day out, but still manageable to carry around.
Overall, this cooler defies the usual soft cooler stereotypes. It’s sturdy, keeps things cold, and looks good doing it.
Whether you’re heading out for a day on the water or a backyard party, this might just be your new go-to.
Laka 45 Quart Rotomolded Cooler with Drain, Basket, Pink

- ✓ Long-lasting ice retention
- ✓ Rugged, durable build
- ✓ Easy to drain and clean
- ✕ Slightly heavy to carry
- ✕ Price is on the higher side
| Capacity | 45 quarts (approximately 36 cans and 45 lbs of ice) |
| Insulation | Thick polyurethane foam walls with airtight gasket, up to 10 days of ice retention |
| Shell Material | Rotomolded polyethylene |
| Drainage System | Fast drain plug for quick emptying |
| Latching Mechanism | Heavy-duty rubber latches |
| Additional Features | Built-in bottle opener, cup holders, non-slip feet, ergonomic side handles |
Imagine you’re setting up for a weekend at the lake, and you want your drinks to stay icy cold all day long. You grab the Laka 45 Quart Rotomolded Cooler, noticing how sturdy and solid it feels in your hands.
The thick walls and airtight gasket promise long-lasting chill, and you’re eager to see if it lives up to that.
Once you load it with ice, drinks, and some snacks, the spacious interior quickly fills up. The 45-quart capacity holds about 36 cans plus plenty of extra room for meats and sandwiches.
The built-in basket keeps things organized, preventing everything from spilling when you open it. The heavy-duty rubber latches feel secure, even if you accidentally bump the cooler during a busy day.
Transporting it is a breeze thanks to the ergonomic side handles, and the non-slip feet keep it stable on uneven ground. The drain plug makes cleanup quick—no fuss, no mess.
Plus, the built-in bottle opener and cup holders add convenience, so you don’t have to search for tools or balance your drinks awkwardly.
Throughout the day, I noticed the ice stayed frozen for nearly 10 days, even in the heat. It’s impressive how well it keeps everything cold without needing frequent refills.
The rugged rotomolded shell feels tough enough to handle rough trips, fishing trips, or even hauling it around on a job site.
At $219.99, it’s an investment, but the durability and performance make it worth considering. Whether you’re planning a beach day or a tailgate, this cooler handles it all with ease.
What Materials Are Best for a Homemade Cooler?
The best materials for a homemade cooler include:
- Foam Insulation: Foam insulation is an excellent material for maintaining temperature due to its high R-value, which measures thermal resistance. This material is lightweight and can be easily cut to fit the dimensions of your cooler, helping to keep contents cold for an extended period.
- Plastic Containers: Using durable plastic containers as the cooler’s shell can provide a waterproof barrier and protect the insulation inside. They are often lightweight, easy to clean, and can be sealed tightly to prevent air exchange, which contributes to better thermal retention.
- Reflective Mylar: Reflective Mylar can be used as an inner lining to reflect heat away from the cooler’s interior. This material is highly effective at maintaining cold temperatures by minimizing heat absorption from the outside environment.
- Wooden Panels: Wooden panels can serve as a sturdy exterior frame for your cooler, providing structural support while also offering insulation properties if combined with insulating foam. Wood is also aesthetically pleasing and can be easily customized to fit your desired design.
- Sealant (Silicone or Weather Stripping): A good sealant is essential to close any gaps where air may enter or escape the cooler. Silicone or weather stripping can be applied around the edges of the cooler lid to create an airtight seal, significantly improving the cooler’s efficiency.
- Ice Packs or Dry Ice: While not a structural material, including ice packs or dry ice within your cooler is vital for temperature control. Ice packs can be refrozen and reused, while dry ice can provide a much colder environment for longer durations, making them ideal for extended trips.
What Steps Should You Follow to Make an Effective Homemade Cooler?
To create the best homemade cooler, follow these key steps:
- Choose the Right Materials: Selecting appropriate materials is crucial for insulation and durability. Common choices include foam insulation boards, plywood, and heavy-duty plastic, which help maintain the internal temperature while being sturdy enough for outdoor use.
- Design the Cooler: Planning the design involves determining the size and shape that meets your needs. A well-thought-out design may include compartments for ice and drinks, maximizing space and efficiency in cooling.
- Insulate Properly: Proper insulation is essential to keep the contents cold for extended periods. Use multiple layers of insulation between the outer shell and the inner compartment, ensuring all sides are covered to minimize heat transfer.
- Add a Drainage System: Incorporating a drainage system helps manage melted ice and prevents a buildup of water inside the cooler. This can be achieved by creating a small drain hole at the bottom with a removable plug for easy cleaning.
- Seal the Cooler: Ensure that your cooler is well-sealed to keep the cold air in and the warm air out. Use weather stripping or silicone sealant around the lid and edges to create a tight seal when closed.
- Test for Effectiveness: Before taking your cooler on a trip, conduct a test by filling it with ice and checking how long it stays cold. This will help identify any areas for improvement in insulation or sealing, ensuring optimal performance during use.
What Designs Can Enhance Your Homemade Cooler’s Efficiency?
Several designs can significantly enhance the efficiency of your homemade cooler:
- Insulation Layering: Utilizing multiple layers of insulation materials, such as foam boards or reflective insulation, can drastically reduce heat transfer into the cooler. This design helps maintain the internal temperature by creating a barrier that slows down heat absorption from the outside environment.
- Drainage System: Incorporating a drainage system can help manage melted ice effectively. By allowing water to drain out, you prevent the cooler from becoming a pool of warm water, which can accelerate the melting of remaining ice and maintain cooler temperatures for a longer time.
- Airflow Optimization: Designing your cooler with strategically placed vents can promote better airflow. This feature allows cool air to circulate while letting warm air escape, which is essential for maintaining a consistent internal temperature and prolonging the cooling effect.
- Reflective Exterior: Coating the exterior of your cooler with reflective materials, such as aluminum foil or reflective paint, helps to deflect heat away from the cooler. This design minimizes heat absorption during hot days, thus extending the cooling period of the contents inside.
- Double-Walled Construction: Building a double-walled cooler, where an outer wall encases an inner wall with air or insulation in between, enhances thermal performance. This design creates an additional barrier against heat transfer, further improving the cooler’s ability to maintain low temperatures.
- Use of Ice Packs: Instead of traditional ice, using gel-filled ice packs can be more efficient as they retain their cold for longer periods. These packs can be strategically placed around the items inside the cooler to ensure even cooling and minimize ice melt.
- Customizable Compartments: Designing the cooler with removable or customizable compartments allows you to optimize space and minimize the amount of warm air that enters when accessing your items. This feature can help maintain a stable temperature, as less cold air escapes during use.
What Insulation Techniques Improve the Performance of a Homemade Cooler?
Several insulation techniques can significantly enhance the performance of a homemade cooler:
- Reflective Insulation: Using reflective materials, such as aluminum foil or Mylar, can greatly reduce heat transfer. These materials reflect radiant heat away from the cooler, keeping the interior colder for a longer period.
- Foam Board Insulation: Incorporating rigid foam board insulation into the cooler’s walls provides excellent thermal resistance. This type of insulation minimizes conductive heat loss, ensuring that the cold air inside the cooler stays trapped.
- Multiple Layers of Insulation: Creating a multi-layer insulating barrier can further improve the cooler’s efficiency. By layering different materials, such as foam, bubble wrap, and reflective surfaces, the cooler can effectively resist both conduction and convection heat transfer.
- Sealing Gaps and Joints: Ensuring that all gaps and joints are properly sealed can prevent cold air from escaping. Using weatherstripping or silicone sealant on the lid and around any openings helps maintain the internal temperature by eliminating air leaks.
- Adding Ice Packs or Dry Ice: Utilizing gel packs or dry ice can enhance cooling performance. These materials provide consistent cold temperatures and, when used alongside insulation, can prolong the effectiveness of the cooler.
- Insulated Lid Design: A well-insulated lid is crucial for maintaining the cooler’s temperature. Consider adding extra insulation to the lid or designing it to fit snugly, which helps minimize heat gain from the top.
What Are the Advantages and Disadvantages of Using a Homemade Cooler?
| Advantages | Disadvantages |
|---|---|
| Cost-effective – Homemade coolers are generally cheaper than store-bought options. | Time-consuming – Building a cooler from scratch requires time and effort. |
| Customization – Users can design a cooler that fits their specific needs. | Durability concerns – Homemade materials may not last as long as commercial products. |
| Eco-friendly – Often made from recycled materials, reducing waste. | Performance variability – Effectiveness can vary based on materials and design. |
| Insulation options – Different materials can be used for insulation effectiveness. | Weight considerations – Homemade coolers might be heavier than store-bought ones due to materials used. |
| Maintenance needs – Some homemade coolers may require more upkeep than commercial products. |
How Can You Maximize the Cooling Efficiency of Your Homemade Cooler?
To maximize the cooling efficiency of your homemade cooler, consider the following techniques:
-
Insulation: Use thick, insulated materials such as foam boards or Styrofoam as the cooler’s walls. This minimizes heat exchange and maintains a lower internal temperature.
-
Use Ice Packs: Instead of regular ice, fill water bottles and freeze them. They last longer and won’t create a watery mess as they melt.
-
Limit Air Exchange: When opening the cooler, do so quickly to reduce warm air influx. Minimize the number of times you open it to keep the cold air inside.
-
Seal Gaps: Ensure that all seams and openings are well-sealed. Use weather stripping or duct tape to close any gaps that may allow warm air to enter.
-
Elevation: Raise your cooler off hot surfaces using a rack or sticks to keep it cooler for longer. Heat can be transferred from the ground, especially in direct sunlight.
-
Shade: Keep your cooler in a shaded area. If you’re outdoors, consider using a cover or tarp to protect it from direct sunlight.
Implementing these strategies can significantly enhance the performance of your homemade cooler, keeping your food and drinks cold for extended periods.
Related Post: